
VTEX Integration
Introduction
This document will provide you with a comprehensive guide to integrating VTEX. You will gain a detailed understanding of the process of installing VTEX, enabling you to swiftly commence your journey with the Zinrelo rewards program.
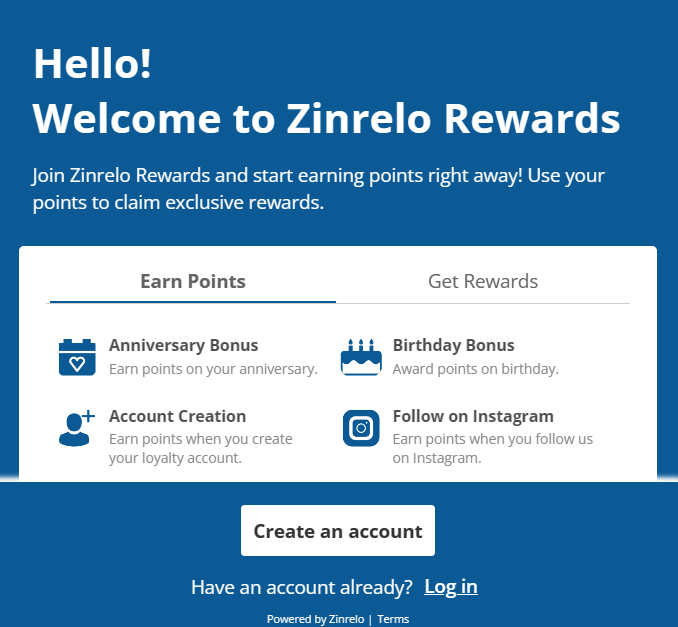
Through this integration, the loyalty dashboard is made available to members. It automatically monitors orders placed and returned on the VTEX store and subsequently awards or deducts points as necessary.
Install Zinrelo Connector
To install the "Zinrelo Connector," follow these steps:
- Go to https://apps.vtex.com/zinrelopartnerus-zinrelo-connector/p
- Click on "Get App."

- Add your store URL where you want to install VTEX.
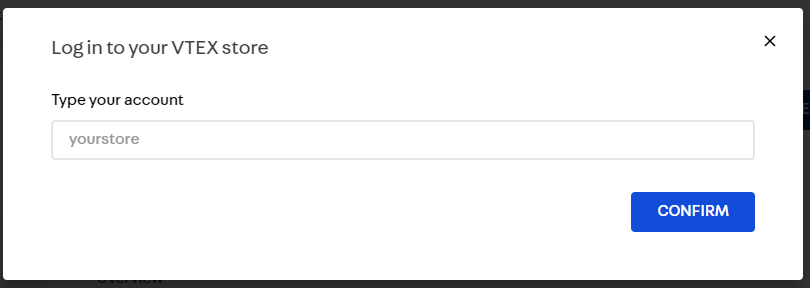
- Your cart will be prepared.
- To make admin changes, click on "Go to Install Page."

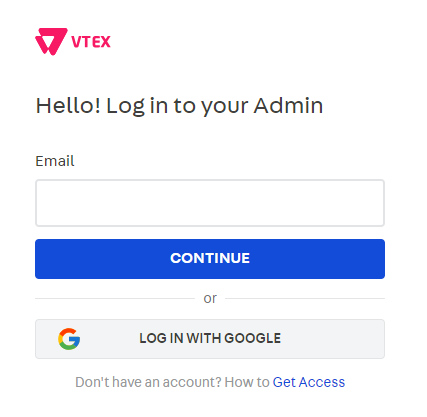
- You will be taken to app store login. Enter login details and click on "Continue."
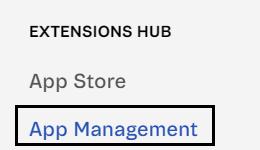
- Go to App >> Extension Hub >> App Management.
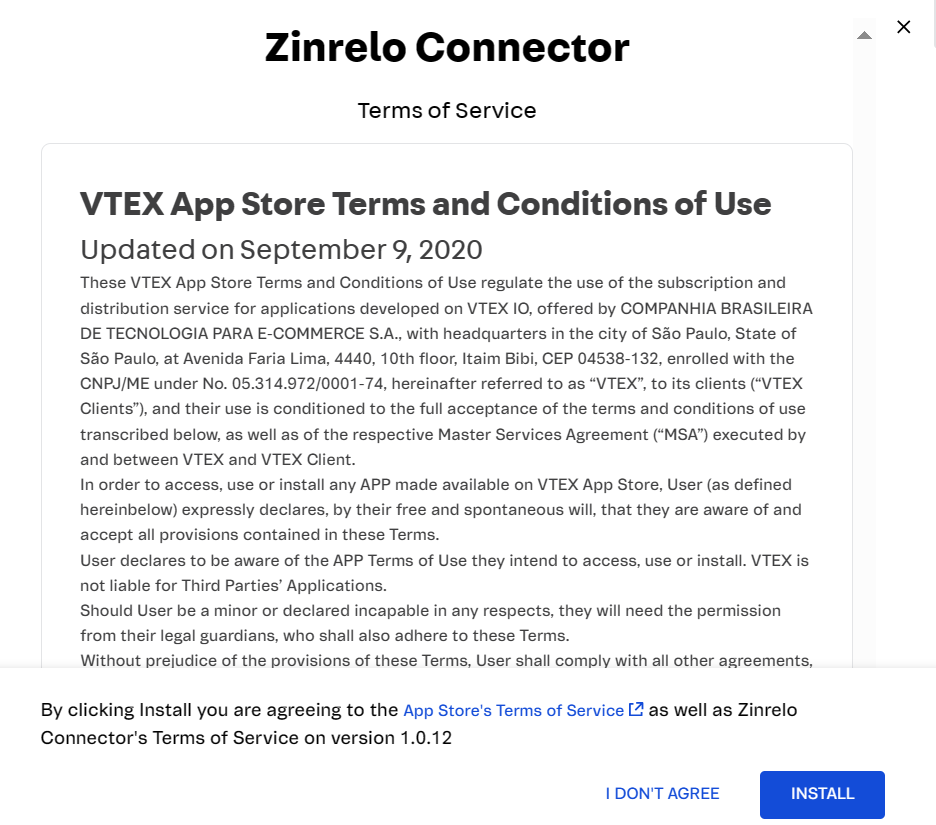
- Search for the "Zinrelo Connector" app and install it.


- Click on the “Install” button.
ZIF and VTEX connector setup
In the Zinrelo Integration Framework (ZIF), our online automation tool, default flows are established. These flows facilitate the exchange of information between ZIF and VTEX. They can be tailored to suit your business requirements. If you wish to make customized adjustments to these flows, please contact your account manager at [email protected].
As part of this flow, a webhook URL is generated, which is employed in specific segments of your VTEX configuration. To obtain this URL, kindly get in touch with your account manager.
Let’s get started.
How to generate application keys and tokens?
Before we begin the configuration process, you need to generate the application key and token. To do this, follow the steps outlined below:
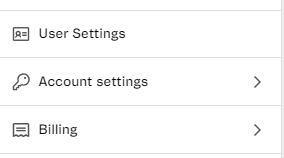
- Navigate to “Account settings.”
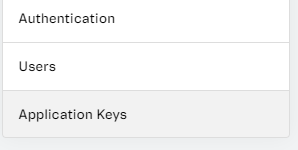
- Click on “Application Keys.”
- Proceed to "Manage Keys" and select "Generate New."


- Label the key, add the Owner (Admin Super) roles, and then click the "Generate" button.
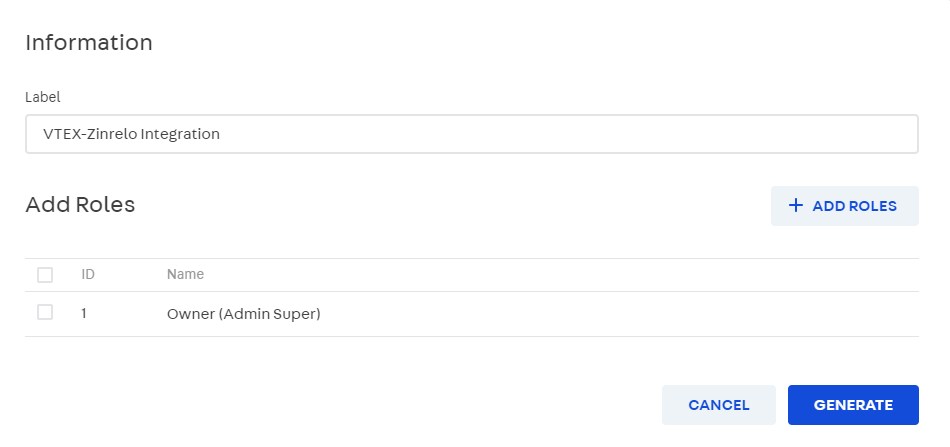
The application key and token will be generated.
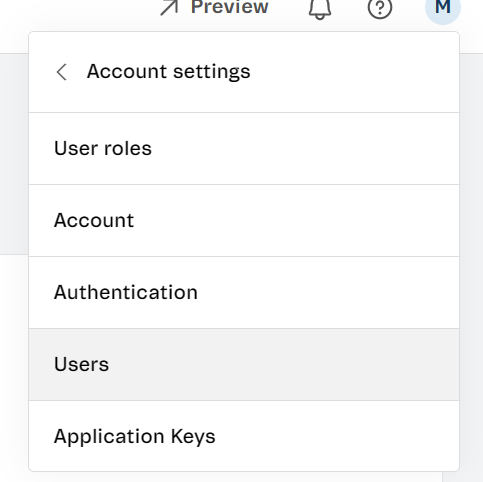
Please note that only a Super Admin can generate the application key. To identify the users with Super Admin access, go to "User Profile" >> "Account Settings" >> "Users."
Configuration settings
To configure the settings page and fill in the input, follow these steps:

Enable loyalty rewards
- Enable the loyalty rewards module: Turn on this setting to activate the rewards module on your website.
- Add Partner ID: Provide your store's partner_id. You can find this information in the admin console under General >> Settings.
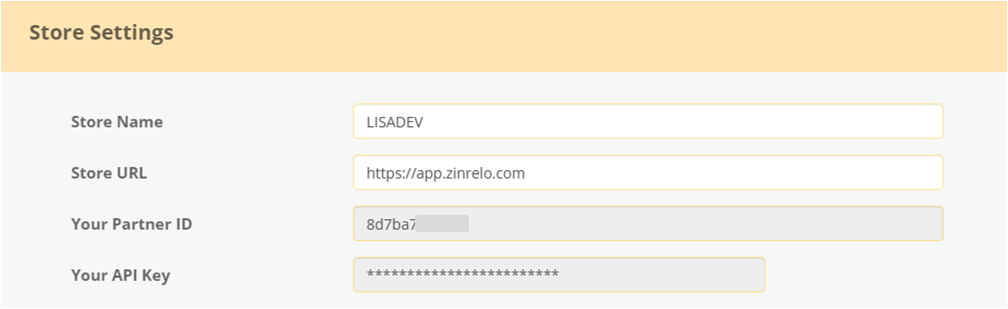
- Add API Key: Enter your store's API Key. You can locate this key in the admin console under General >> Settings.
Please Note: The API key will only be visible to administrators with full access.
- Add Custom Attributes: To ensure seamless integration, it is crucial to incorporate two essential custom attributes:
- Last website visit timestamp (Date Type)
- External member id (String Type)
Note: For the creation of these attributes, please contact your account manager at [email protected].
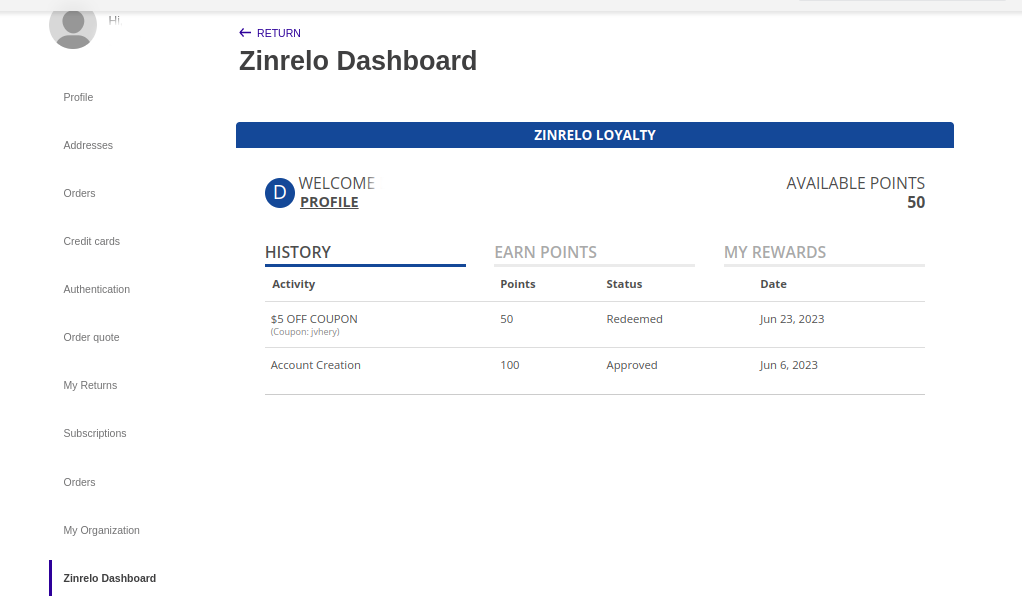
Displaying loyalty dashboard
The Zinrelo Dashboard on my account page will display by default. To display it on other pages, you can include this block:
{
  "store.home": {
    "children": [
      "list-context.image-list#demo",
+     "zinrelo-dashboard"
    ]
  }
},
{
  "store.product": {
    "children": [
      "product-name",
      "product-rating-summary",
+     "zinrelo-dashboard"
    ]
  }
}
Setting- up rewards
- Enable reward points on product pages: Enable this setting, if you want to display members' reward points on product pages.
To display points on the product page, you have to include this block:
{
  "store.product": {
    "children": [
      "product-name",
      "product-rating-summary",
+     "zinrelo-points"
    ]
  }
}
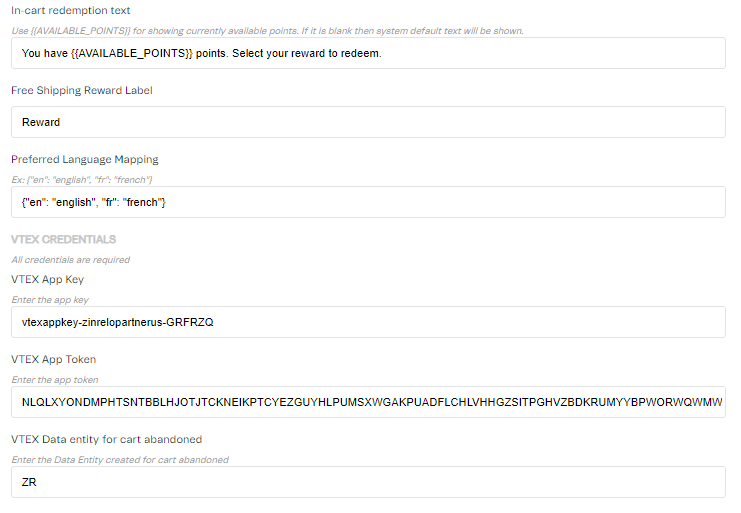
- Reward points text on product pages: Customize the text for reward points. If left blank, the system default text will be used.

Setting-up in-cart redemption
- Enable in-cart redemption: Activate this setting if you want to allow customers to redeem rewards in their shopping cart during the checkout process.
- In-cart redemption text: Customize the text for in-cart redemption points. If left blank, the system default text will be used.
- Free Shipping Reward Label: Define the label that appears when customers earn "Free Shipping Rewards." You can customize this label.
To enable in-cart redemption, it's necessary to synchronize Zinrelo rewards with VTEX. The steps of synchronization are briefed below:
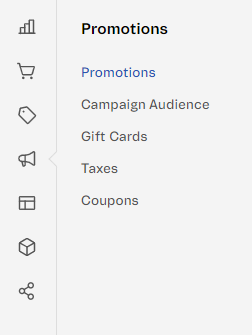
a. Click on Promotions.
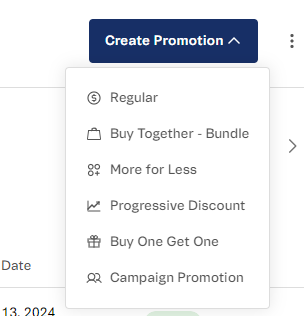
b. Click Create Promotion>> Regular.
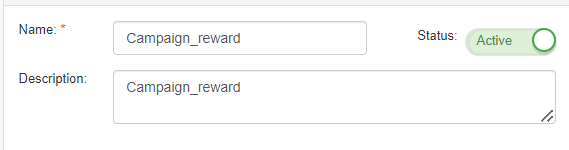
c. Fill in the details:
i. Name: Provide an appropriate name for the reward.
ii. Description: Describe the reward in detail.
iii. Expiration Date: Specify the date on which the reward will expire. Determine how long you want the reward to remain visible to your clients.
iv. Select the discount type:

Discount types in VTEX should sync with the reward types in Zinrelo-
| Zinrelo | VTEX |
|---|---|
| Fixed Amount Discount | Nominal |
| Percentage Discount | Percentage |
| Free shipping | Free shipping |
| Product redemption | Gift |
Note: Only those discounts can be synced with VTEX that are configured in Zinrelo. The discount amount should be same as configured in Zinrelo admin console,
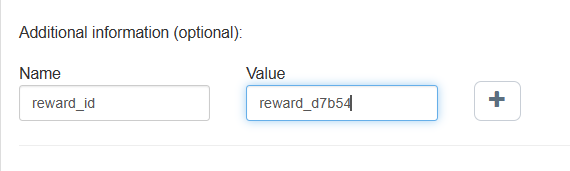
v. Add reward ID: Ensure that the reward_id matches the redemption ID configured in the Zinrelo admin console.
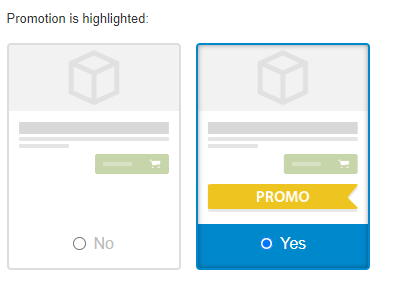
vi. Promotion is highlighted: Select yes if you wish to show reward to your end-user.
vii. To which items will this promotion apply? Select the option.
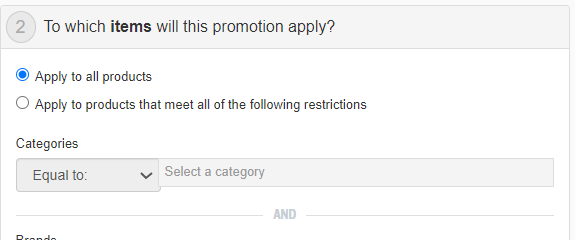
You can apply it to all products or specific products by using the "product category" parameter.
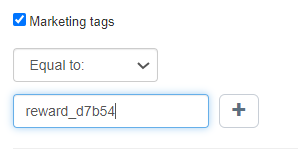
viii. Marketing Tags: Enable this setting and add reward_id.
d. Save the configuration.
Language mapping
- Preferred Language Mapping: For multilingual stores, map your store's language to VTEX.

Use the format "VTEX language": "store language" and separate multiple mappings with commas.
Update VTEX app key and app token
- VTEX App Key: Enter your VTEX app key.
- VTEX App Token: Enter your VTEX app token.
To know how to create the VTEX app key and token, go to this part of the document.
Setting-up cart abandonment
VTEX Data entity for cart abandoned: Specify the data entity acronym for cart abandonment tracking.
The steps to creating acronym for cart abandonment are mentioned below:
Create the data entity
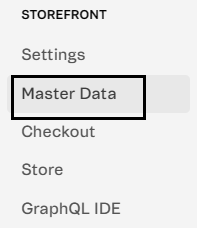
- Go to Store Settings >> Storefront >> Master Data.
- Then click on Applications >> Advanced Settings.

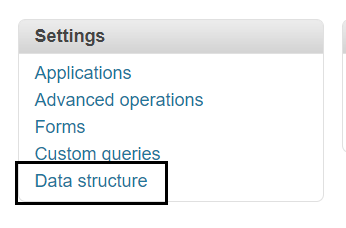
- Click on Data Structure to create the entity.

- Click on Data Entities and “Add New” button.
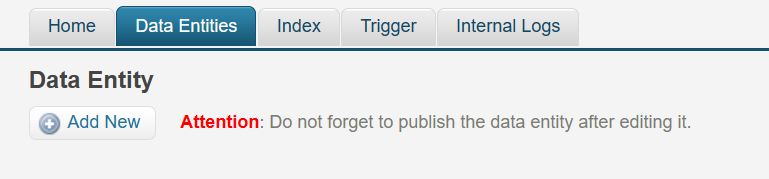
- Enter the acronyms and data entity name.
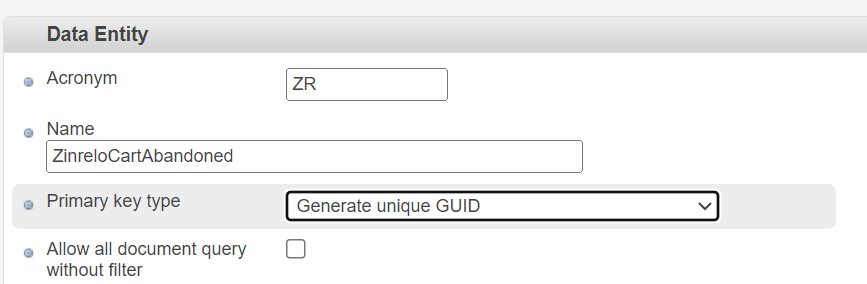
Please Note: You can keep any acronym and name for the data entity.
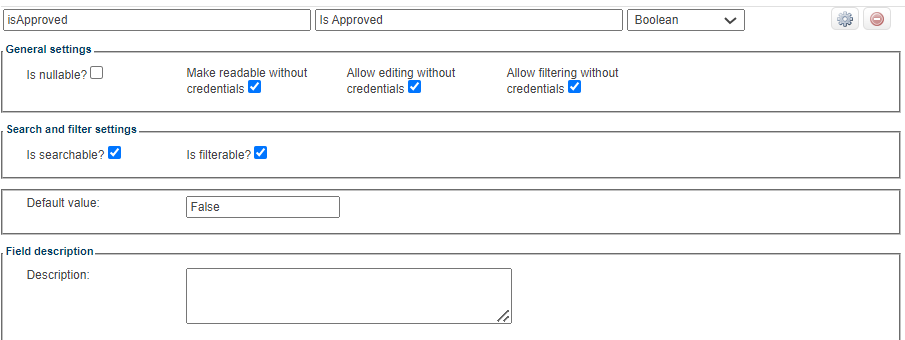
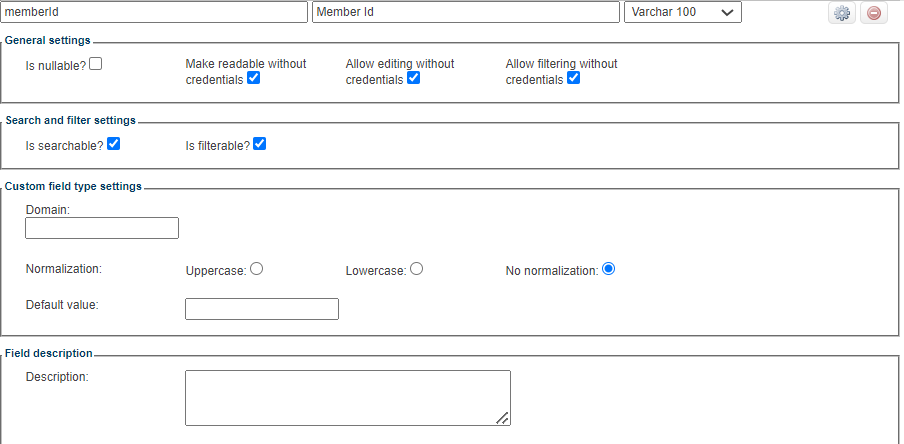
- Add the field details.
isApproved: Display Name as Is Approved and type boolean- default value is “False.”.
memberId: Display Name as Member Id and type varchar(100).
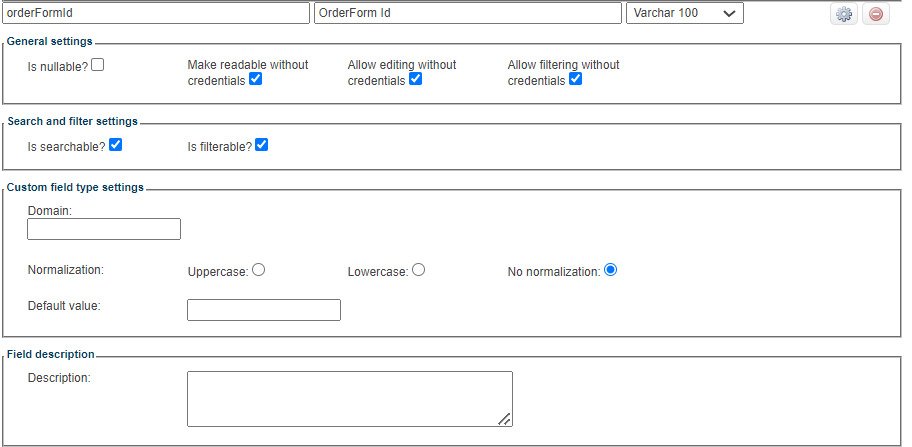
orderFormId: Display Name as OrderForm Id and type varchar(100).
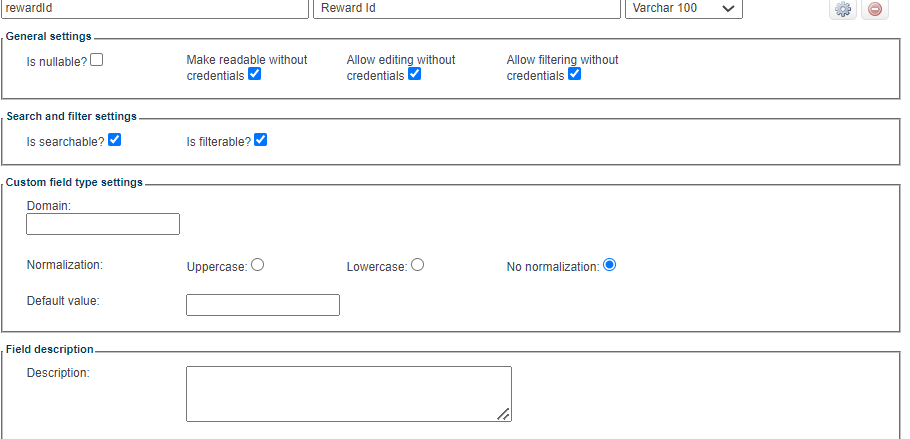
rewardId: Display Name as Reward Id and type varchar(100).
transactionId: Display Name as Transaction Id and type varchar(100).
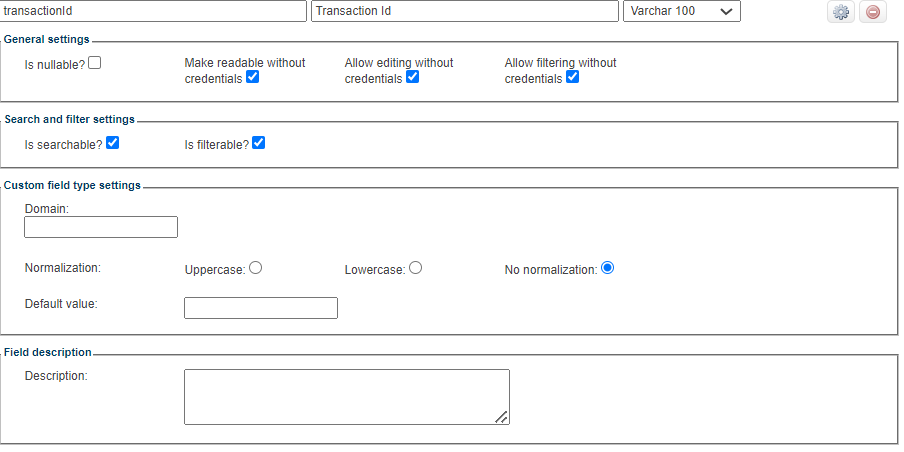
Note: Make sure to add the details as it is shown in the details and screenshots.
- Save the changes.
- Find the acronym you created from the list of the acronyms. Publish and index.

For detailed information, refer to this document.
Add the trigger
- Click on the “Trigger” button.

- Click on the “Add New” button.

- Configure the trigger.
a. Name: Give the trigger a name. You can give any name.
b. Data Entity: From the dropdown, select the data entity you created.
c. Status: It should be enabled.

d. Rules: Rules should always be “A record is created.”
e. Schedule: This is to create a schedule on fetching the member data when they abandoned the cart.

f. If Positive: Select “Send an HTTP Request” action.
Sync the website
- URL: https://{{account}}.myvtex.com/v0/cartSession. Replace {{account}} with the website or host name, for example: https://zinrelo.myvtex.com/v0/cartSession
- Method: POST
- Headers:
content-type: application/json
accept: application/json - Content as JSON: Copy and paste the given code to “Content as JSON”:
  {
    "approved": "{!isApproved}",
    "memberId": "{!memberId}",
    "orderFormId": "{!orderFormId}",
    "reward_Id": "{!rewardId}",
    "transactionId": "{!transactionId}",
    "id": "{!id}",
    "dataEntityId": "{!dataEntityId}"
}- In Response Action-
Data Entity: Select cart abandoned entity you created.
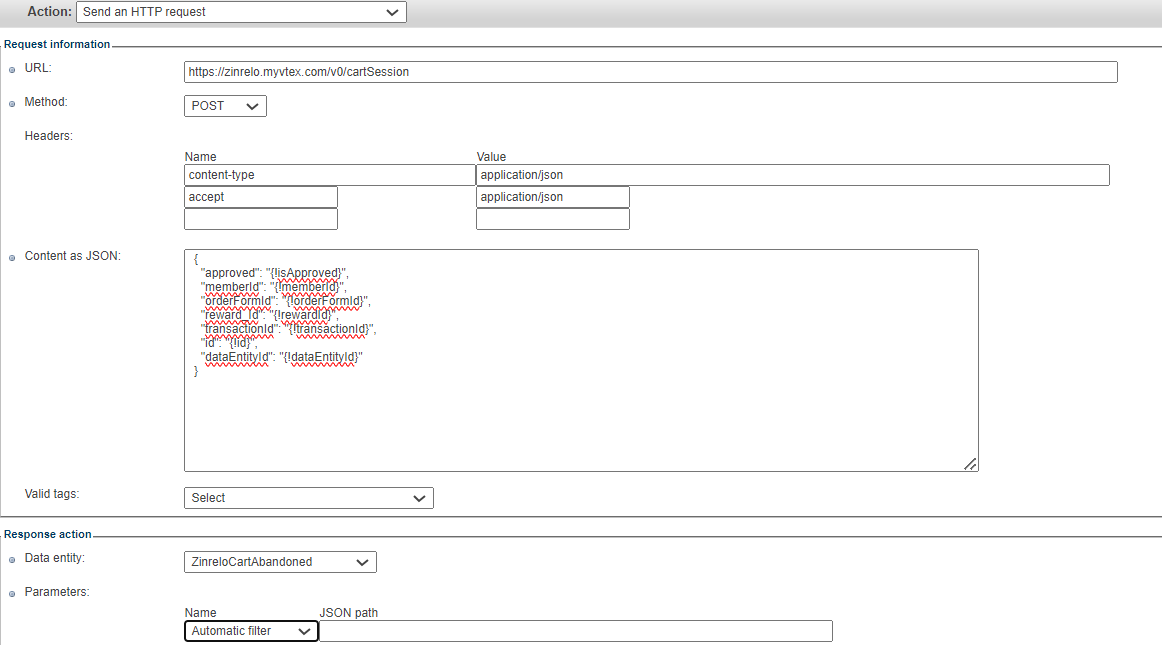
And save the settings.
Now add the acronyms you created to the Zinrelo Connector settings page and save.

For more details, refer to this document.
Add tags to cart abandoned members
If you wish to assign tags to abandoned members for easy identification and management, you should synchronize the ZIF webhook with VTEX. Just as you synchronize the website, you can simultaneously sync your webhook in the same manner.
For this follow the given steps:
- URL: Enter the ZIF webhook URL. For example: https://integrations.zinrelo.com/webhook/57/webhook/***
(Please Note: Reach out to your account manager at [email protected] for a ZIF webhook url. Refer to this section of the document for more information.) - Method: POST
- Header:
partner-id: 'your_partner_id'
api-key: 'your-api-key' - Content as JSON:
{ "State": "zrl-cart-abandoned", "memberId": "{!memberId}", "dataEntityId": "{!dataEntityId}" } - In Response Action:
Data Entity: Select cart abandoned entity you created.
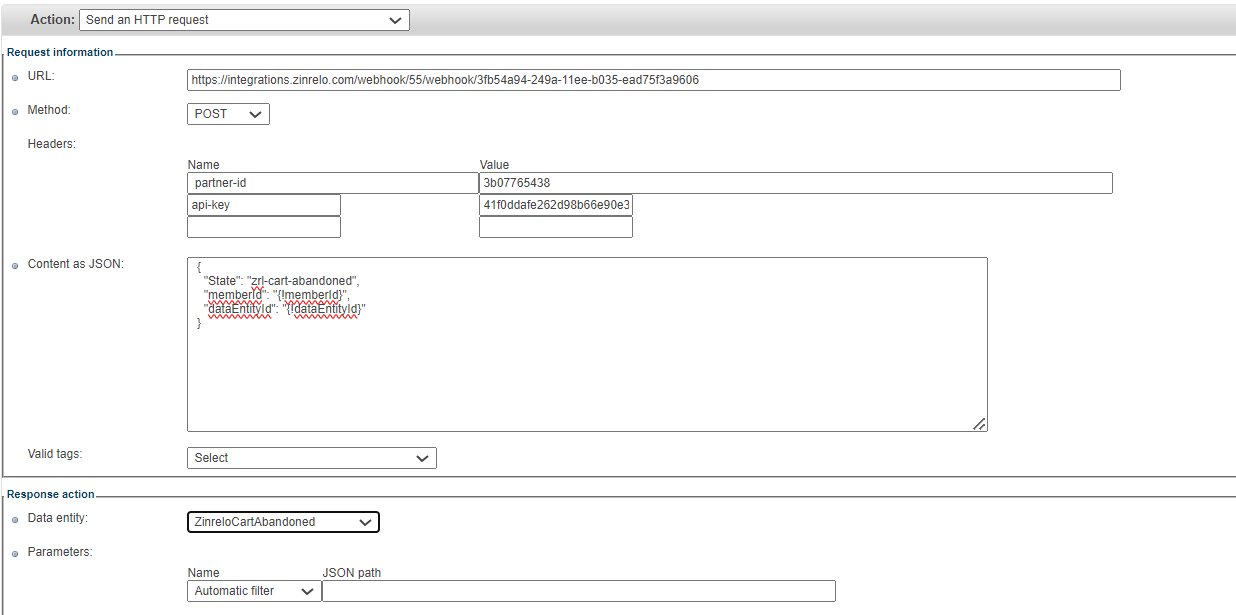
And save the settings.
When will the cart-abandoned tags be removed?
The cart-abandonment tags will be removed when a member performs one of the following actions: "creates the order," "completes the order," "makes the payment," or "invoices the order."
Tracking Order Returns
To sync your order return details (full or partial) with VTEX, you will need to create an entity. This synchronization is accomplished using the acronym "RZ."
To create the data entity, please follow the given steps:
Data Entity
- Go to Store Settings >> Storefront >> Master Data.

- Then click on Applications >> Advanced Settings.
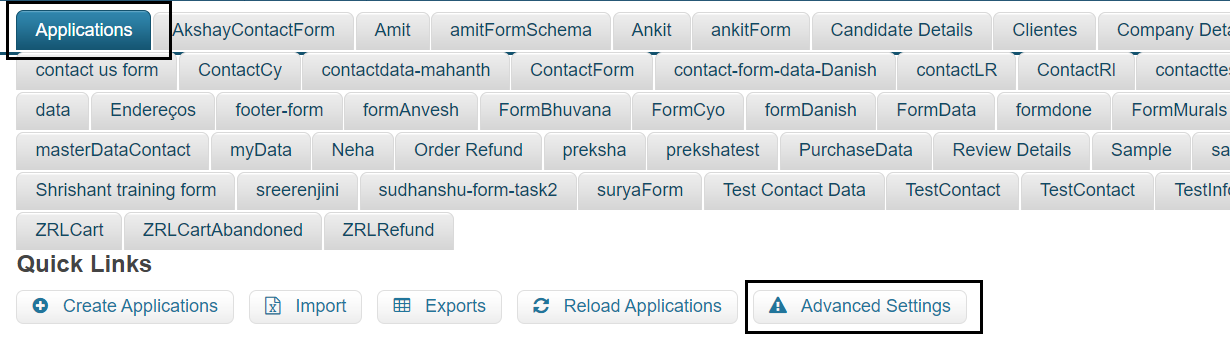
- Click on Data Structure to create the entity.
- Click on the “Add New” button.

- Enter the acronyms and data entity name.
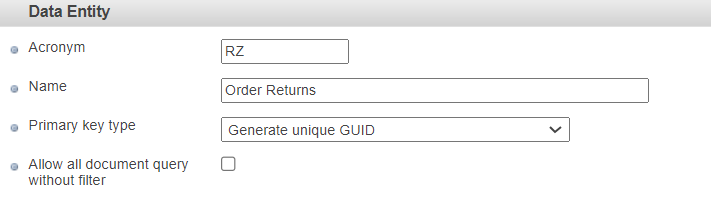
Note: The acronym name should be “RZ”.
- Add the field details.
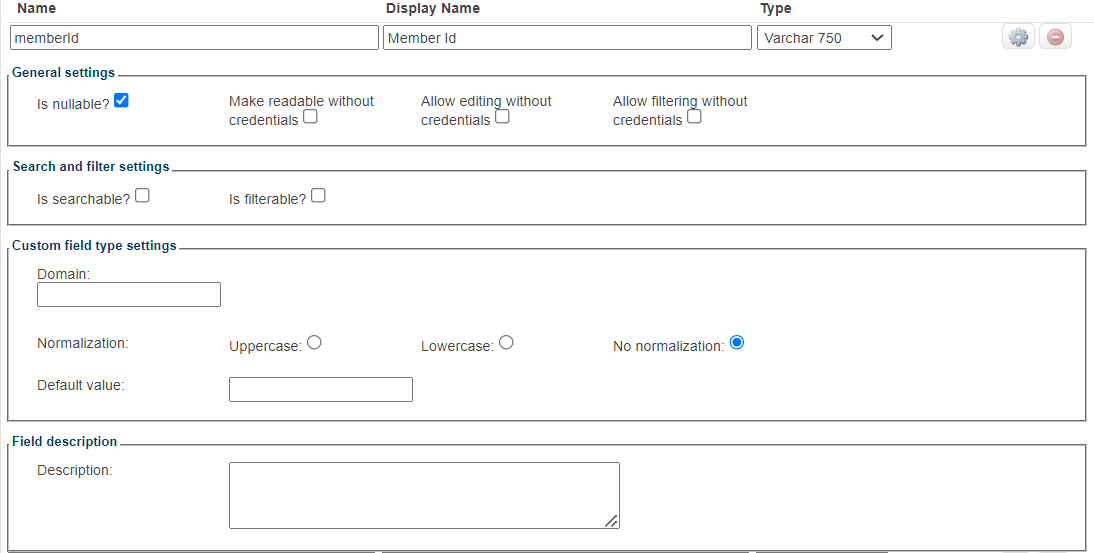
memberId: Display Name as Member Id and type varchar(750).
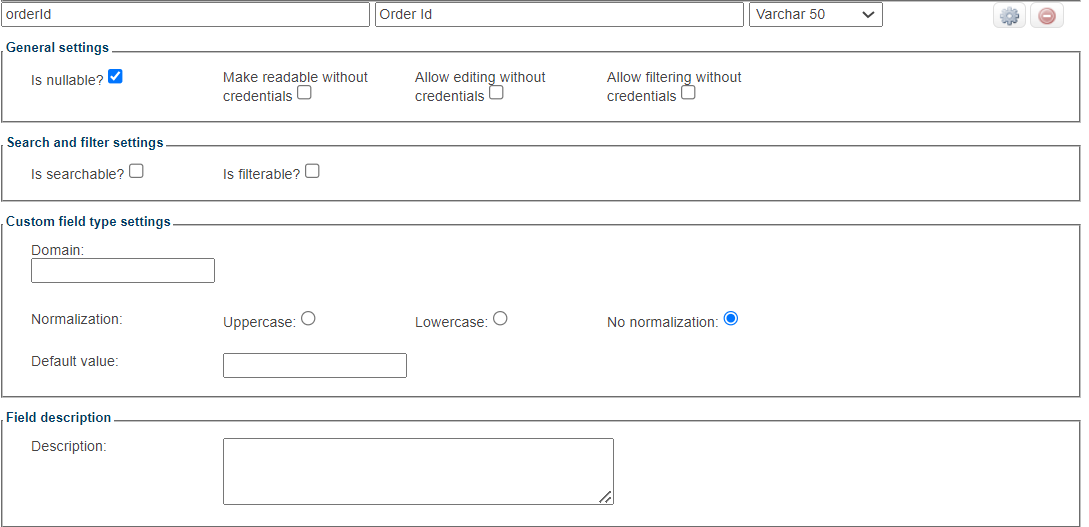
orderId: Display Name as Order Id and type varchar(50).
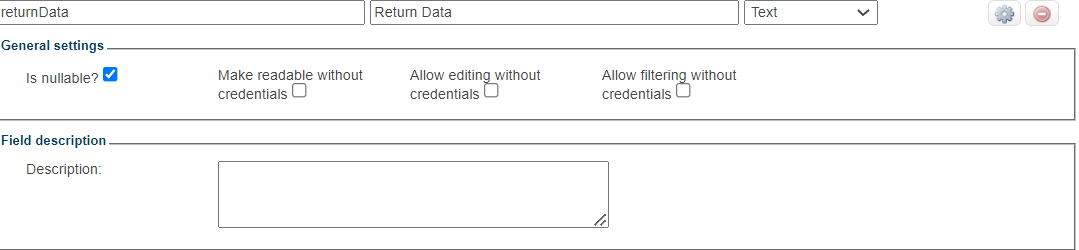
returnData: Display Name as Return Data and type text.
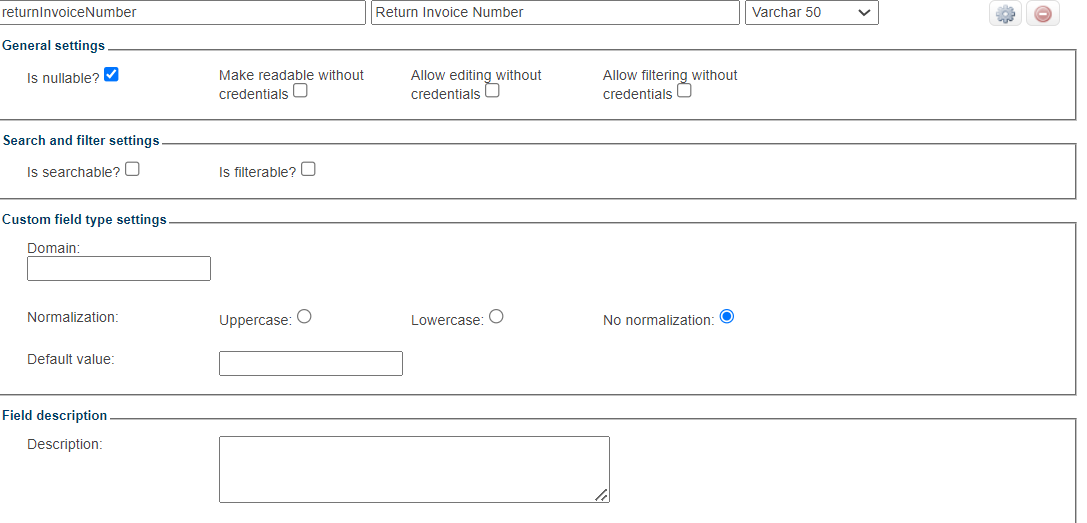
returnInvoiceNumber: Display Name as Return Invoice Number and type varchar(50).
Note: Make sure to add the details as it is shown in the details and screenshots.
- Save the changes.
- Find the acronym you created from the list of the acronyms. Publish and index.
For detailed information, refer to this document.
Indexing
- Click on the “Index” button and then “Add New” button.
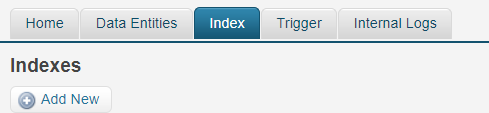
- Select
returnInvoiceNumberfrom the available field.

- Click on the “Save” button.
- From the list of entities, select the Data Entity you created on click on the publish button.

Please Note: The order returns on VTEX are tracked based on the product ID and quantity.
In addition to above mentioned steps, to sync order return details with VTEX, you have to execute below given cURL command:
curl --location --request POST 'https://websiteurl/api/orders/hook/config' \
--header 'Accept: application/json' \
--header 'Content-Type: application/json' \
--header 'X-VTEX-API-AppKey: <YOUR_VTEX_APP_KEY>' \
--header 'X-VTEX-API-AppToken: <YOUR_VTEX_APP_TOKEN>' \
--data-raw '{
    "filter": {
        "type": "FromOrders",
        "expression": "status = \"invoiced\" and $count(packageAttachment.packages.restitutions.Refund.value) > 0",
        "disableSingleFire": true
    },
    "hook": {
        "url": "<ZIF_WEBHOOK_URL>",
        "headers": {
            "partner-id": "<YOUR_PARTNER_ID>",
            "api-key": "<YOUR_API_KEY>"
        }
    }
}'
Note: For zif_webhook_url, reach out to your account manager at [email protected].
Sync events/ point details
To synchronize point details within the VTEX platform, you must initiate the API call. You can configure the following events to award or deduct points:
- "order-created"
- "payment-approved"
- "on-order-completed"
- "on-order-completed-ffm"
- "invoiced"
- "canceled"
In the provided cURL command, configure only those events for which you intend to award or deduct points.
curl --location --request POST 'https://websiteurl/api/orders/hook/config' \
--header 'Accept: application/json' \
--header 'Content-Type: application/json' \
--header 'X-VTEX-API-AppKey: <YOUR_VTEX_APP_KEY>' \
--header 'X-VTEX-API-AppToken: <YOUR_VTEX_APP_TOKEN>' \
--data-raw '{
    "filter": {
        "type": "FromWorkflow",
        "status": [
            "order-created",
            "on-order-completed"
        ],
        "disableSingleFire": false
    },
    "hook": {
        "url": "<ZIF_WEBHOOK_URL>",
        "headers": {
            "partner-id": "<YOUR_PARTNER_ID>",
            "api-key": "<YOUR_API_KEY>"
        }
    }
}'
Please Note: The VTEX application key and token will be new for each API call.
Debugging log
To debug the log, you have the option to create a form. It's completely optional, but we highly recommend doing so.
To create a form, follow these steps:
- Navigate to Applications, then Advanced Settings, and click on Forms.
- Click the "New" button to initiate the form creation process.
- In the details section, provide the following information:
a. Name: Give your form a suitable name.
b. Data Entity: Choose the data entity you wish to associate with the form from the dropdown menu.
c. Select the "Display Fields" option, ensuring that you choose the same fields you previously added while creating the data entity.
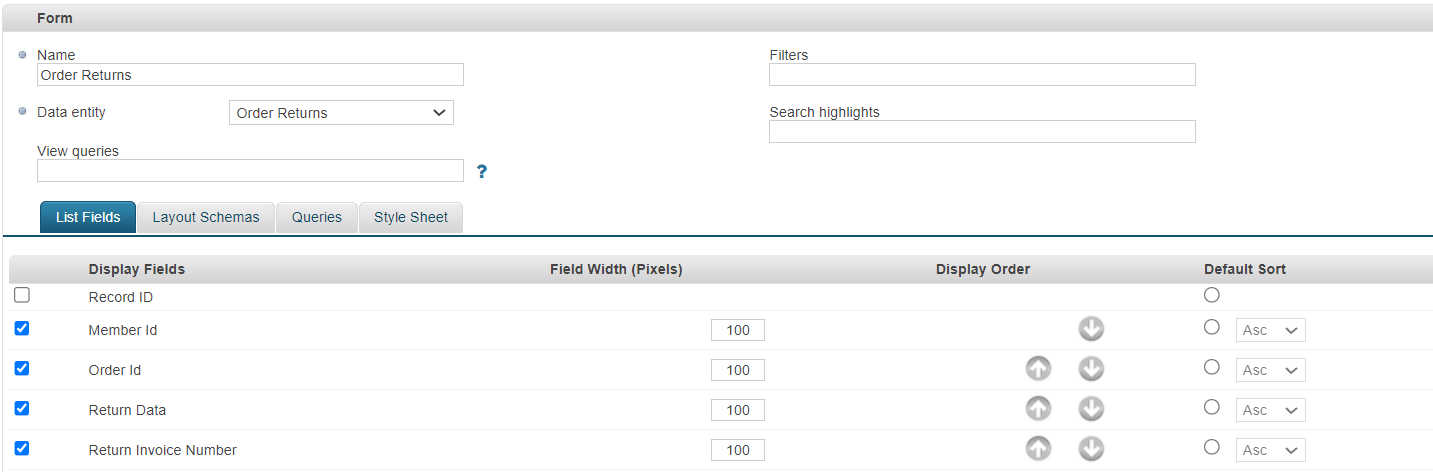
d. Head to "Layout Schemas" and once again select the list of fields you want to include.
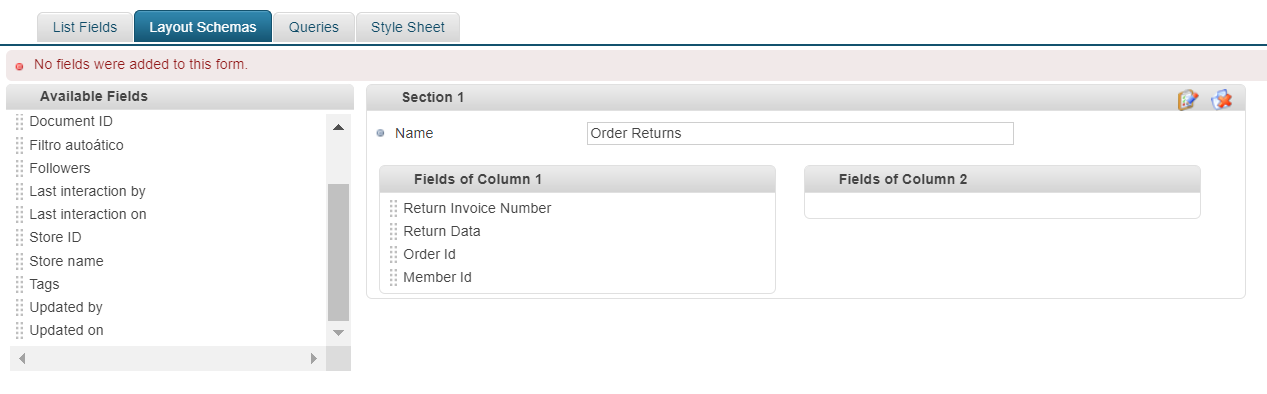
e. Save your form configuration.
The newly created form will now be visible and accessible from this location.

CSS Customization
To make CSS changes, you need to modify your manifest.json file.
- Create a file called
zinrelopartnerus.zinrelo-connectorinside thestyles/cssfolder. Add your custom styles:
.dashboardWrapper {
  margin-top: 10px;
}
- To use this app or override the default CSS you need to import it in your dependencies on
manifest.jsonfile:
"peerDependencies": {
    "zinrelopartnerus.zinrelo-connector": "1.x"
  }
- In order to apply CSS customizations in this and other blocks, follow the instructions given in this Using CSS Handles for store customization.
Updated about 2 months ago