
Salesforce Sales Cloud and Marketing Cloud Integration
This document will guide you through the process of syncing your Salesforce Sales Cloud and SFMC accounts.
Before you start with syncing, you need to install the Salesforce Sales Cloud package. Click here for more details.
Installation
It’s time to install the managed package. A managed package is a collection of components and applications that make the connection between your Salesforce Sales Cloud and Marketing Cloud accounts work. Follow along with these steps to download the latest version of the managed package.
- Make sure you are using the latest version of a supported web browser, and then click on one of these URLs.
- Production Org: https://sfdc.co/MCC
- Sandbox Org: https://sfdc.co/MCCSandbox
- Sign in to your Salesforce Sales Cloud account using your admin credentials, and then click Install for Admins Only.
- Click Install. (If prompted, grant access to these third-party websites).
- Click Continue.
Note: Be sure to wait until the managed package installation is complete before moving on to the next step.
Configure Salesforce Sales Cloud Settings
Modify Page Layouts
In order to see email activity from within a Salesforce Sales Cloud account, we need to make some modifications to page layouts. This layout configuration is for Admins.
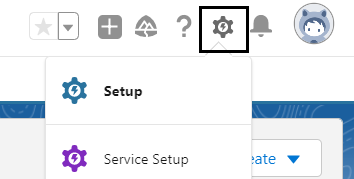
- Click on the gearbox, and then click on "Setup."
- Follow the path- Object Manager>> Search User >> User Page Layouts.
- Click on "Edit."

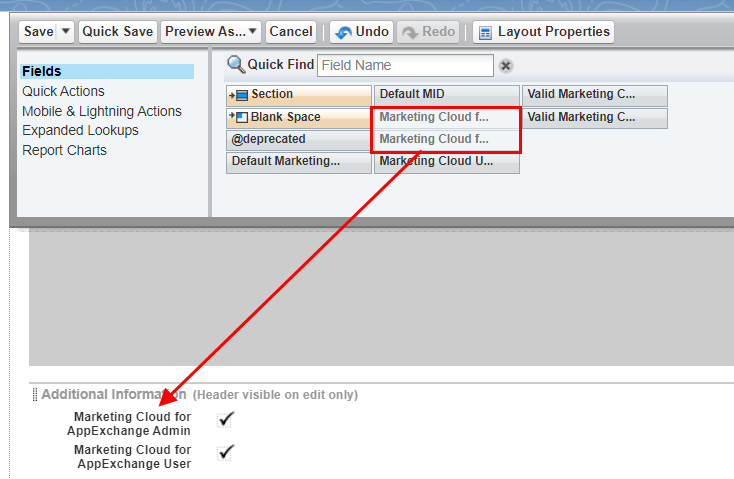
- Drag "Marketing Cloud for AppExchange Admin" and "Marketing Cloud for AppExchange User" from the palette to the Additional Information section of the user page layout.
- Click "Save."
Modify Lead Page Layout
In order to have the details of all leads from your loyalty program, let's update the lead page layout.
- Click on the gearbox, and then click on "Setup."
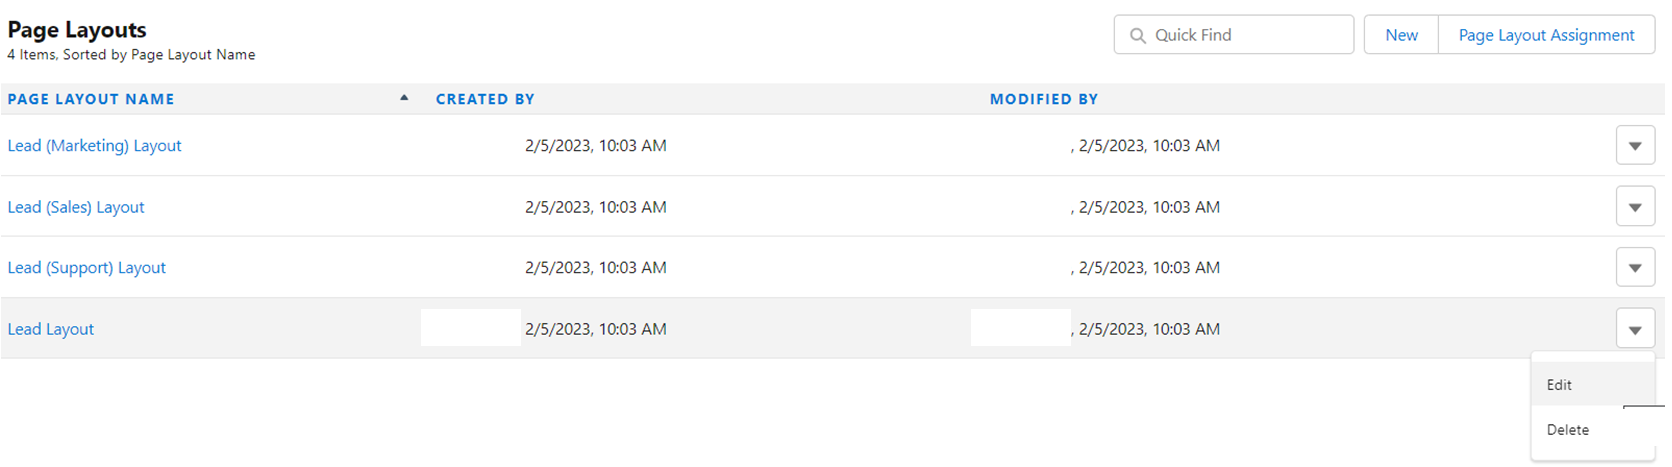
- Follow the path- Object Manager>> Search Lead >> Page Layouts.
- Identify a page layout to work with and click Edit.
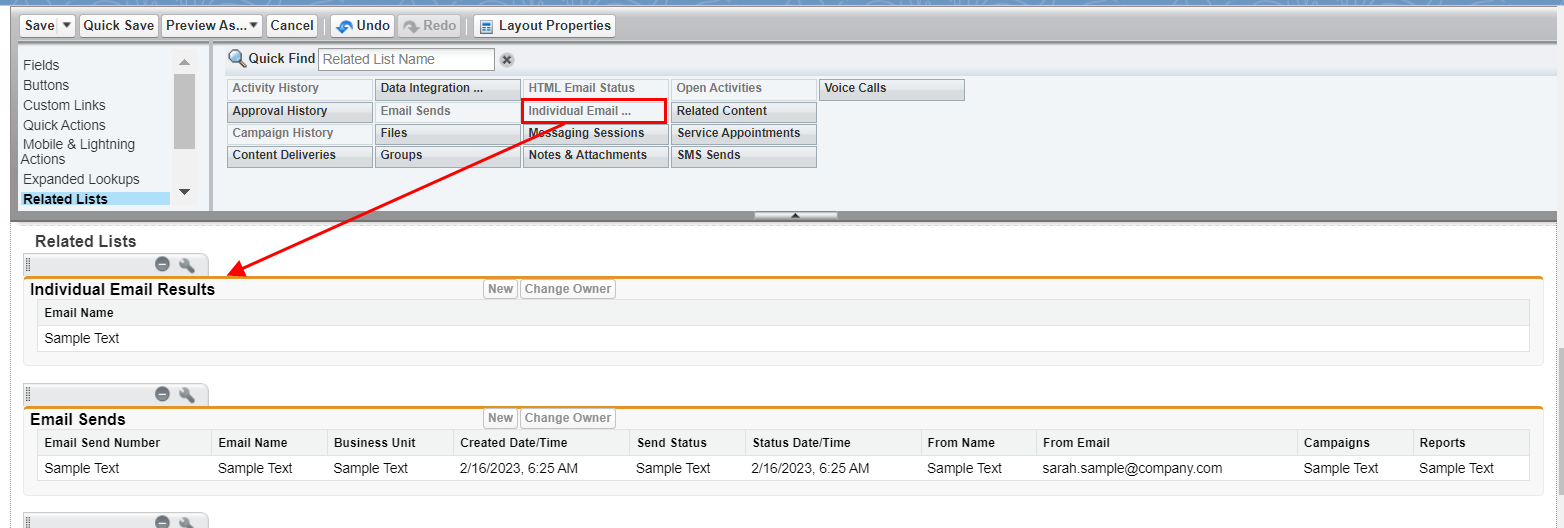
- In the layout you selected, from the tool palette options, select Related Lists.
- Drag "Email Sends" from the palette to the bottom of the Lead Page layout to create a new related list.
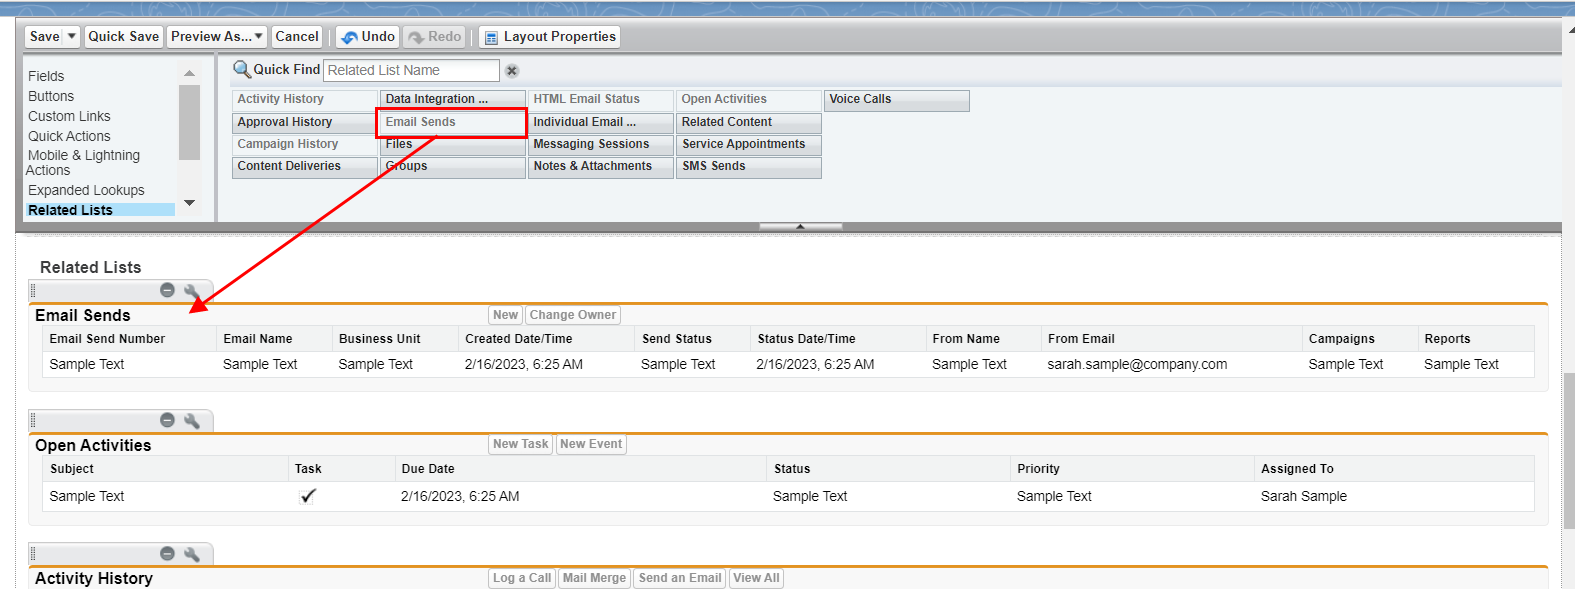
- Then drag "Individual Email Results" from the palette to the bottom of the Lead Page layout to create another new related list.
- Next, select Visualforce Pages from the palette options, and drag and drop "LeadActions" to the description information section.
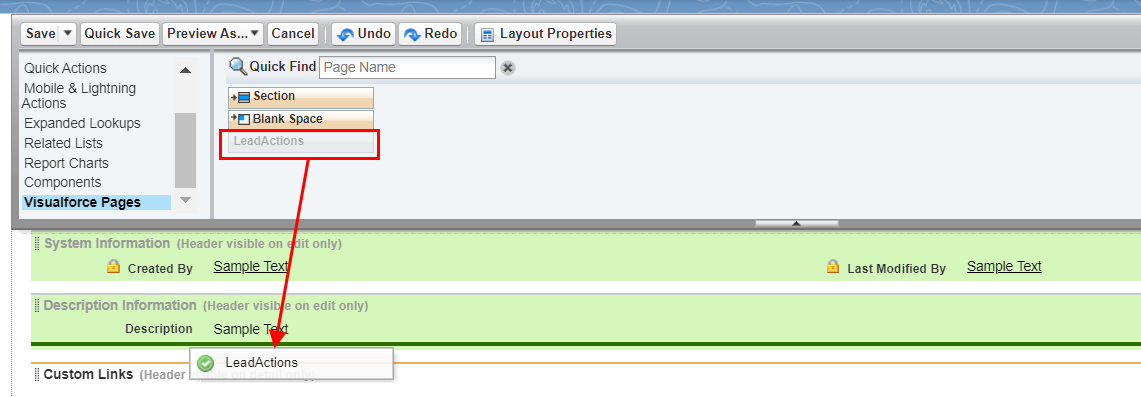
- Save it.
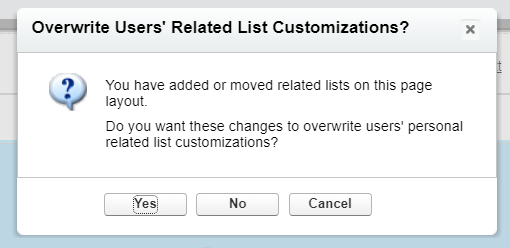
- Click "Yes" to Overwrite Users’ Related List Customizations?
Modify Contact Page Layout
In order to have visibility to all emails sent to leads and contacts from Salesforce Sales Cloud, let's update the contact page layout.
- Click on the gearbox, and then click on "Setup."
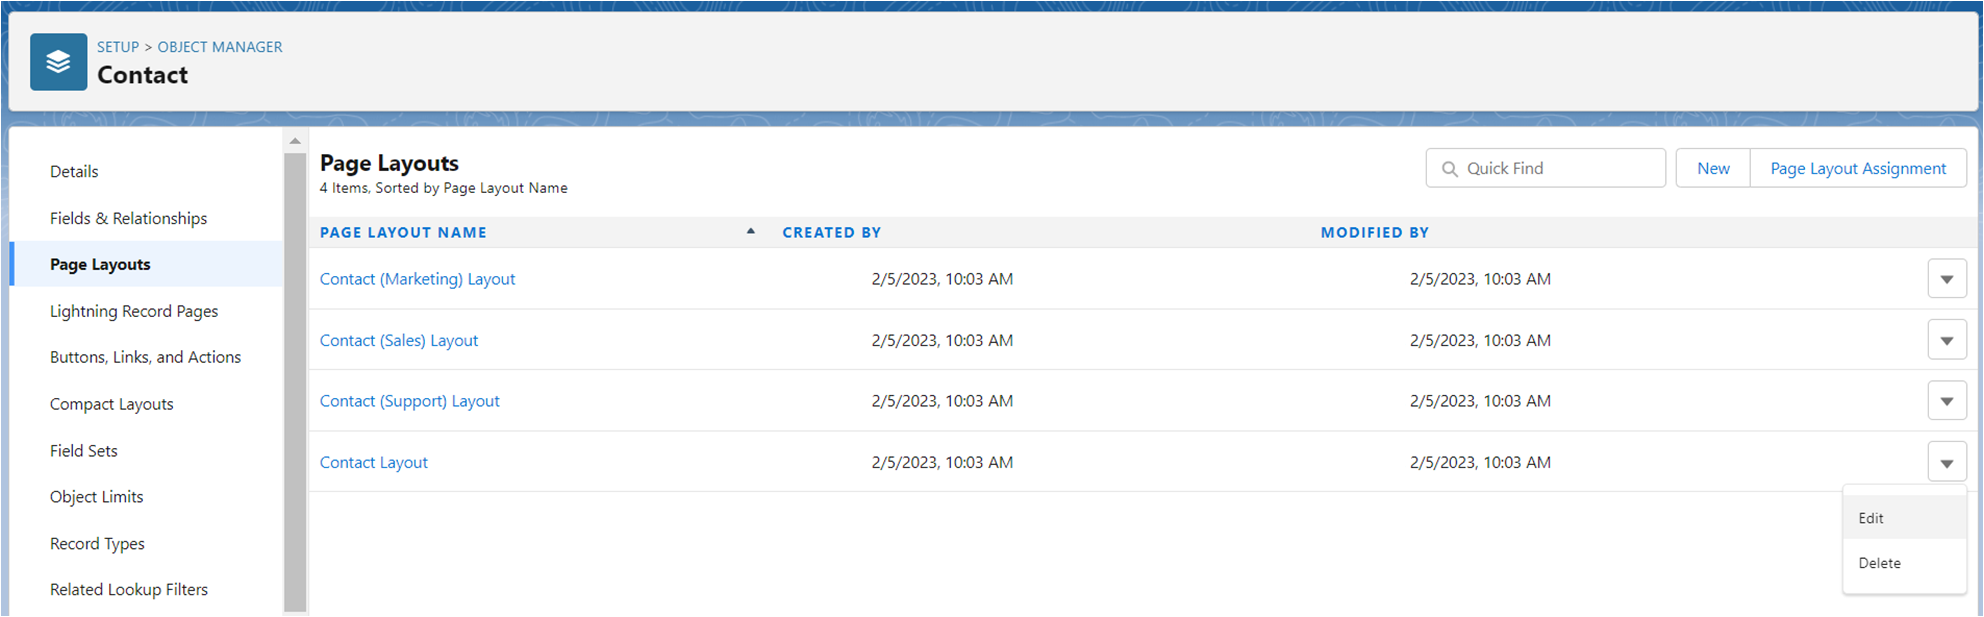
- Follow the path- Object Manager>> Search Contact >> Page Layouts.
- Select a layout to update that only admins see. Once selected, click on Edit.
- In the tool palette, select Related Lists. Drag Email Sends from the palette to the bottom of the Contact page layout to create a new related list.
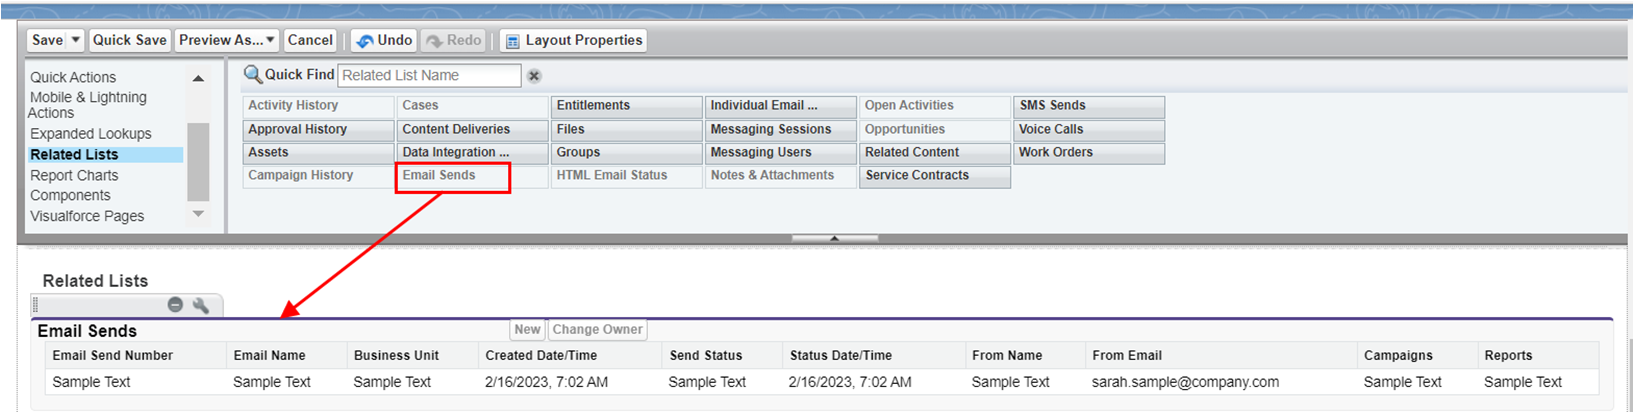
- Drag Individual Email Results from the palette to the bottom of the Contact page layout, following Email Sends, to create another new related list.

- Click "Visualforce Pages" in the palette. Drag "ContactActions" from the palette to the Additional Information section of the Contact page.
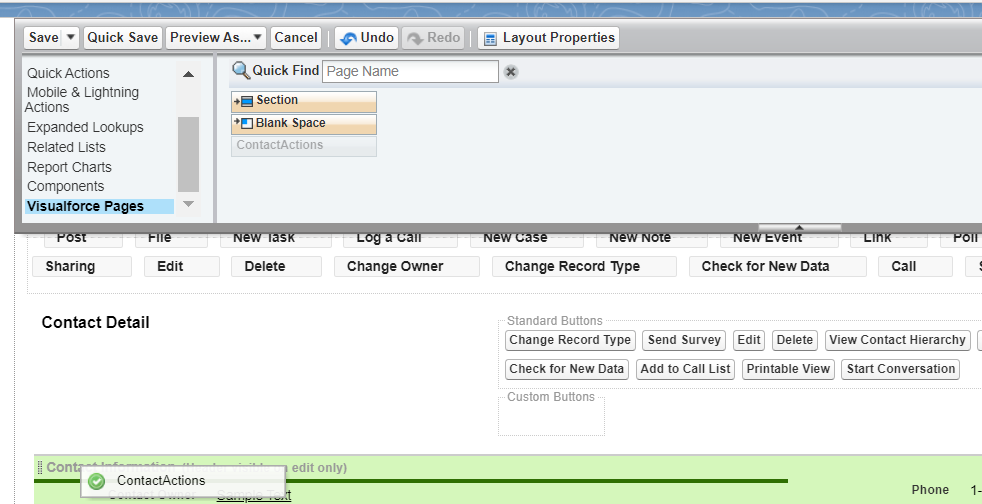
- Click "Save."
- Click "Yes" to Overwrite Users’ Related List Customizations?
Grant Access to Your Marketing Cloud Connect Admin
In order to grant some permissions to your Marketing Cloud Connect admin (this can be you or another user), follow the given steps:
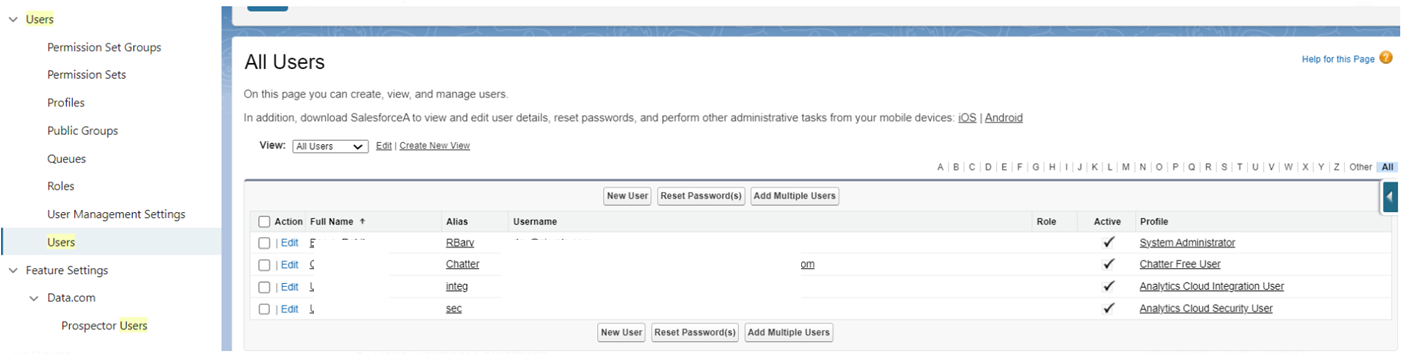
- Follow the path- Search "Users" in quick search>> Click Users.
- Click Edit next to the name of the admin user you’ve identified.
- Under Additional Information, select Marketing Cloud for AppExchange Admin and Marketing Cloud for AppExchange User.

- Click Save.
Note: If you don't see Marketing Cloud for AppExchange Admin and Marketing Cloud for AppExchange User follow these steps.
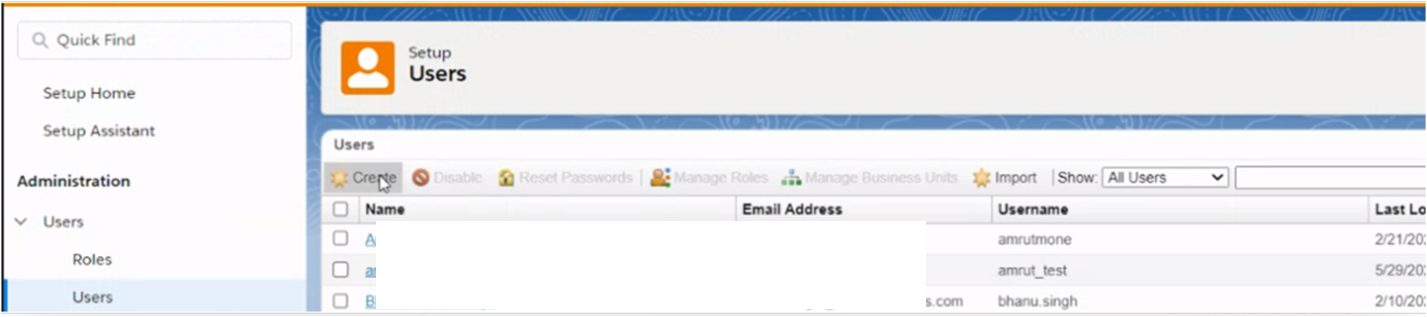
Set Up the Salesforce Sales Cloud API User
Create the Salesforce Sales Cloud API user (also called the Salesforce System user), which connects Salesforce Marketing Cloud to your Salesforce Sales Cloud.
- Follow the path- Search "Users" in quick search>> Click Users.
- Click on "New User."
- Create a new user with the following settings:
- First Name: John
- Last Name: Doe-CRM
- Email: Use an email address that you have access to.
- Username: Must be unique and in the format of an email address. We suggest: [email protected]
- User License: Salesforce
- Profile: System Administrator
- Role: Specify the role.
Note: There are limits to User Licenses, to check your license status, search "Company Information" in quick search and click.
- Under General Information, click the "Marketing User" checkbox.
- Under Additional Information, select the "Marketing Cloud for AppExchange Admin" and "Marketing Cloud for AppExchange User" checkboxes.
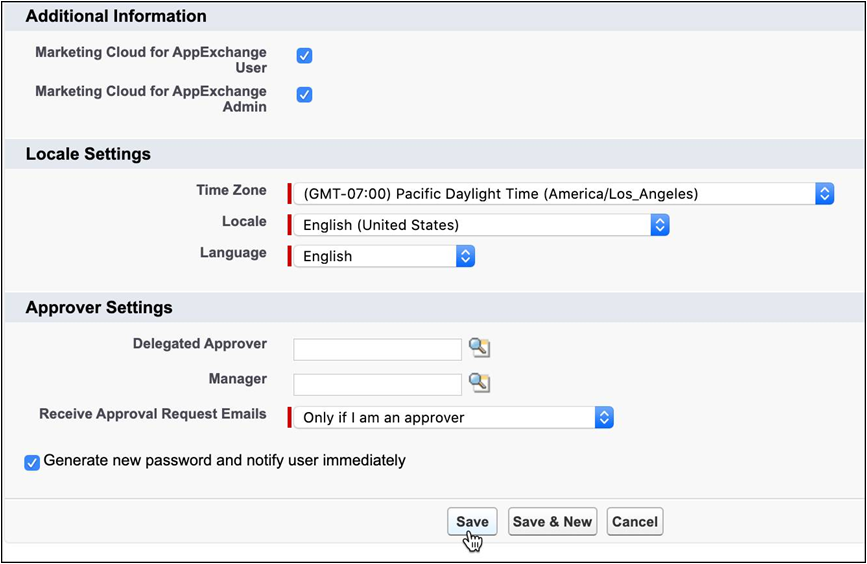
- Select the checkbox for "Generate new password and notify user immediately."
- Click on "Save."
Important: An email will be sent to the address you specified. Follow the instructions in that email to verify the identity of the new user record and specify the password for this new user account.
Note: If you don't see Marketing Cloud for AppExchange Admin and Marketing Cloud for AppExchange User follow these steps.
Create Permission Set in Salesforce Sales Cloud
For the two systems to communicate properly, we need to create a generic permission set in Salesforce Sales Cloud and update Marketing Cloud connected app settings. This is required to grant access to Marketing Cloud users connecting to Salesforce Sales Cloud.
- Follow the path: Search "Users" in quick search>> Permission Sets.
- Click "New."

- Enter permission set information. We suggest the label "Marketing Cloud Connected App" and a description that reads, "Gives access from Salesforce Sales Cloud to Marketing Cloud."

- Click Save.
- Click "Manage Assignments" and then click "Add Assignments."
- Select the CRM API User account you created in the last section.
- Click Assign, and then Done.

Update Field-Level Security
The email opt-out field is standard on the Contact and Lead objects. For Marketing Cloud Connect to work properly, you need to ensure that all Marketing Cloud Connect users have view access to this field.
Leads Security
- Follow the path Object Manager>>Lead >> Fields & Relationships>> Email opt-out.
- Click on "Email opt-out" and then on "Set Field-Level Security."

- Check the "Visible" box for all user profiles, including the System Administrator profile, that need access to Marketing Cloud Connect.
- Add read-only restrictions based on your business requirements to any user profiles that should not be able to edit this value, such as the Partner Community User.
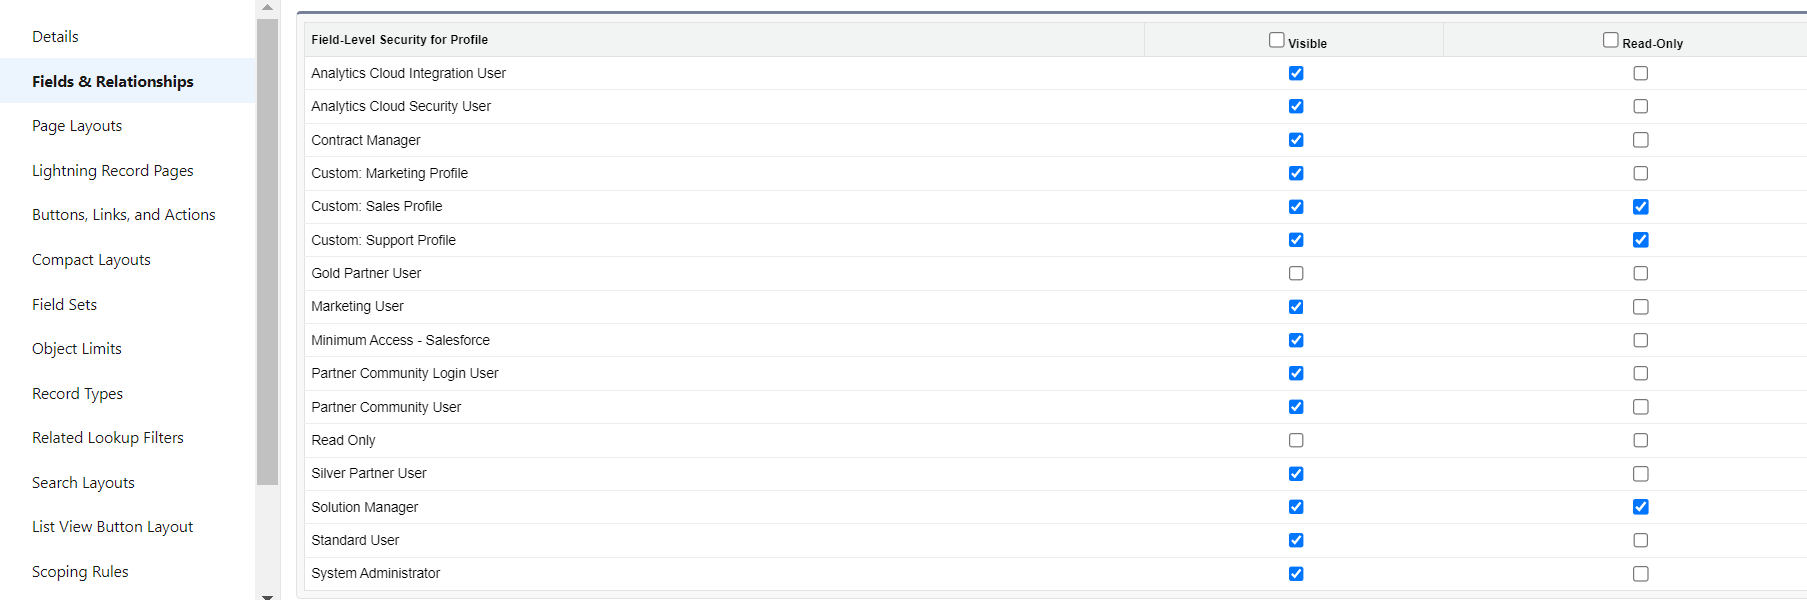
- Click on the "Save" button.
Contacts Security
- Follow the path- Object Manager>>Contacts >> Fields & Relationships>> Email opt-out.
- Click on "Email opt-out" and then on "Set Field-Level Security."

- Check the "Visible" box for all user profiles, including the System Administrator profile, that need access to Marketing Cloud Connect.
- Add read-only restrictions based on your business requirements to any user profiles that should not be able to edit this value, such as the Partner Community User.
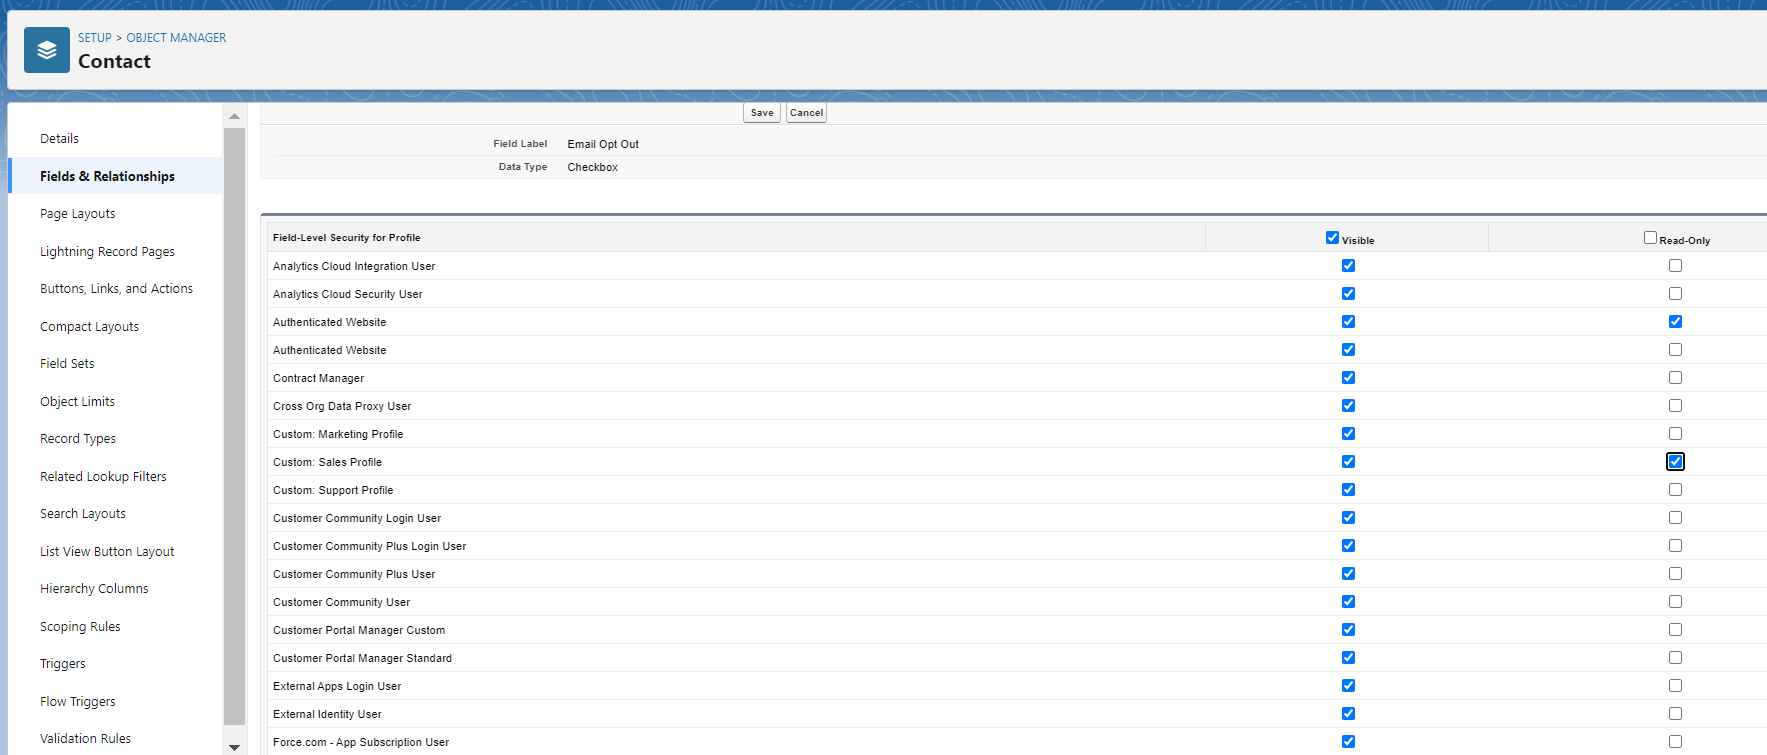
- Click on the "Save" button.
Configure Marketing Cloud
Marketing Cloud Connect API User
Just like Salesforce Sales Cloud, Marketing Cloud requires a user account for its connection to the Salesforce Sales Cloud environment. It’s a best practice to dedicate a user license solely for this purpose. Here’s how to set up your Marketing Cloud Connect API user.
Create a User
- In Marketing Cloud, hover over your username and select "Setup."
- From the Setup screen, type "Users" into the Quick Find box and click "Users."
- Click "Create."
- Enter your email address for the Reply Email and Notification Email Address fields.
- Enter a unique username, for example, MC-API-User.
- Leave the External Key field blank, unless your organization requires it.
- Select a Time Zone and a Culture Code.
- Select an API user.
- Create a temporary password.
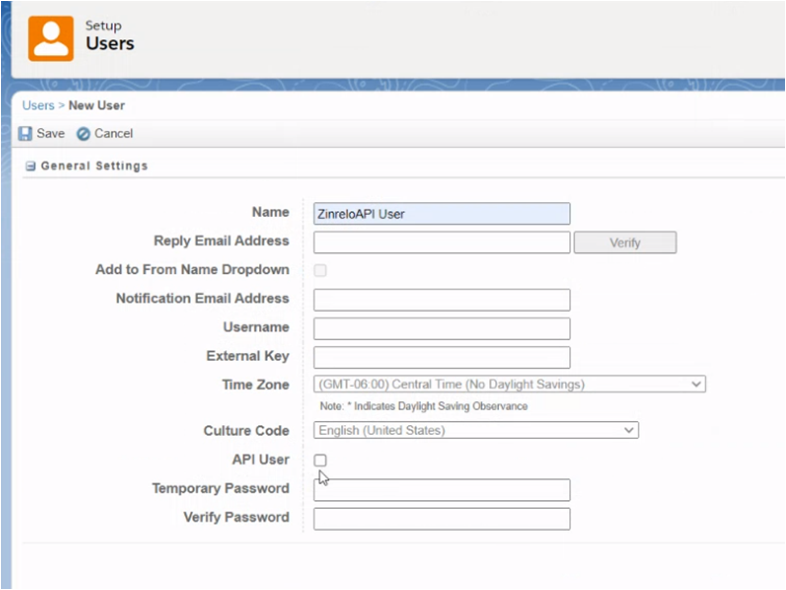
- Click Save.
Manage Roles for Users
- From the Users screen, select the checkbox next to the user you just created.
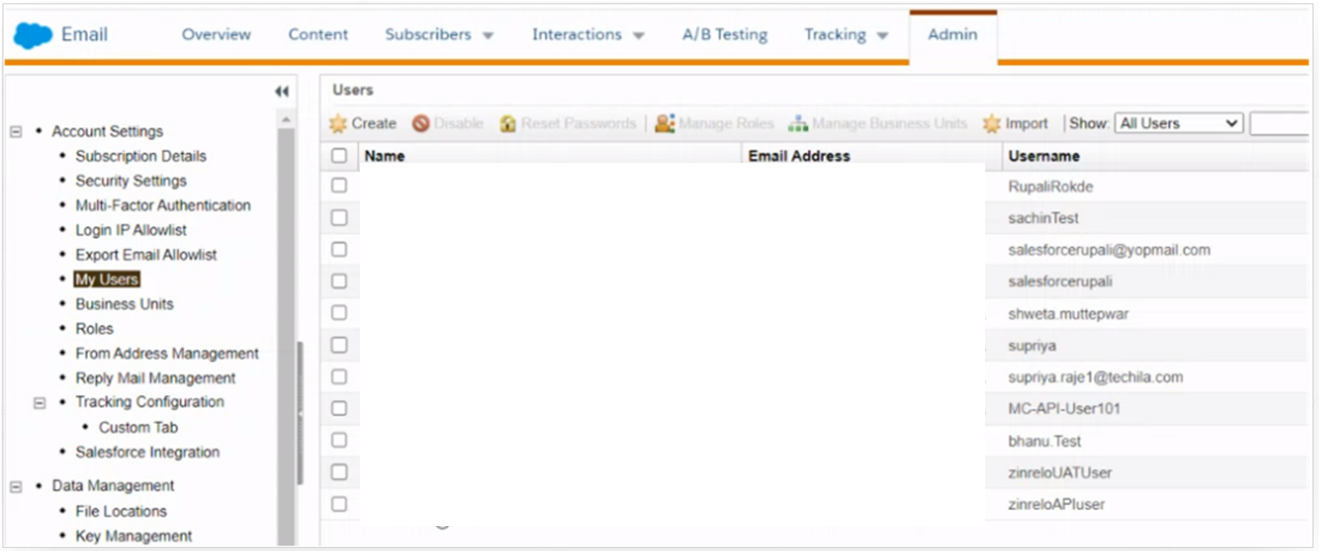
- Click "Manage Roles."
- Click "Edit Roles."
- Assign the following roles:
- Administrator
- Marketing Cloud Administrator
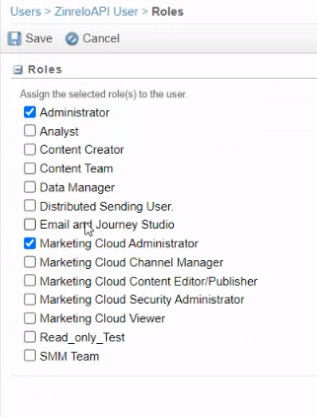
- Click Save.
- Log out of Marketing Cloud and immediately log back in with the Marketing Cloud Connect API User credentials you just created.
Configure the Marketing Cloud Connection
Once logged back into Marketing Cloud, navigate back to Setup. It’s time to connect your Marketing Cloud account to the corresponding Sales Cloud or Service Cloud org. Before you begin this process, be sure to log out of your Salesforce Sales Cloud account. (Closing the tab doesn’t log you out.) This prevents an incorrect connection, since the system automatically connects to any active Salesforce session.
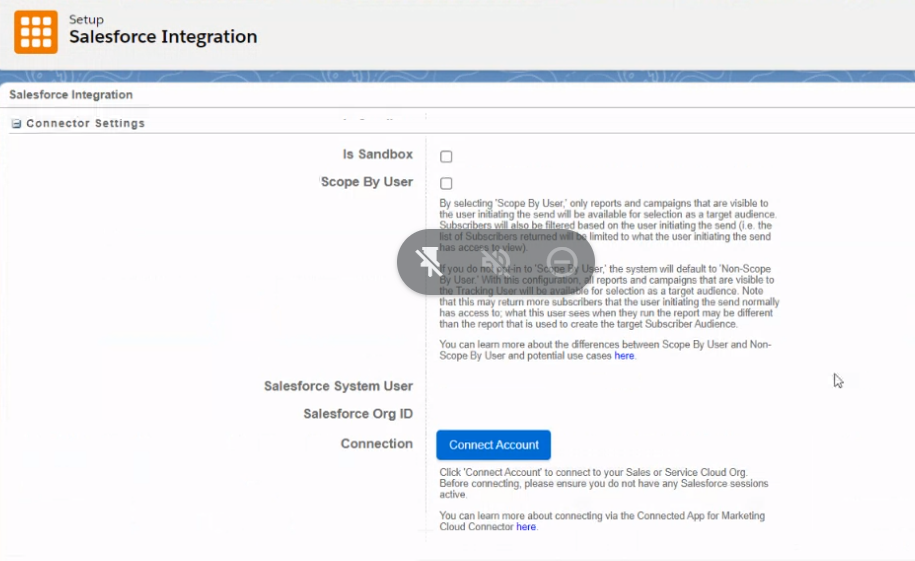
- In Marketing Cloud Setup’s Quick Find field, type "Salesforce Integration."
- Once found, select Salesforce Integration.
- Click "Edit."
- Make sure "Scope by User" is deselected.
- Click "Connect Account."
- Click OK to acknowledge the popup window.
- A login page displays in a new window. If you log in to Salesforce through a company-specific login page, select Use Custom Domain and enter the domain address before entering your user credentials. For example, if your org's login URL is https://example.my.salesforce.com, enter example.
- Enter the username and password for the CRM API user that you created in the last unit.
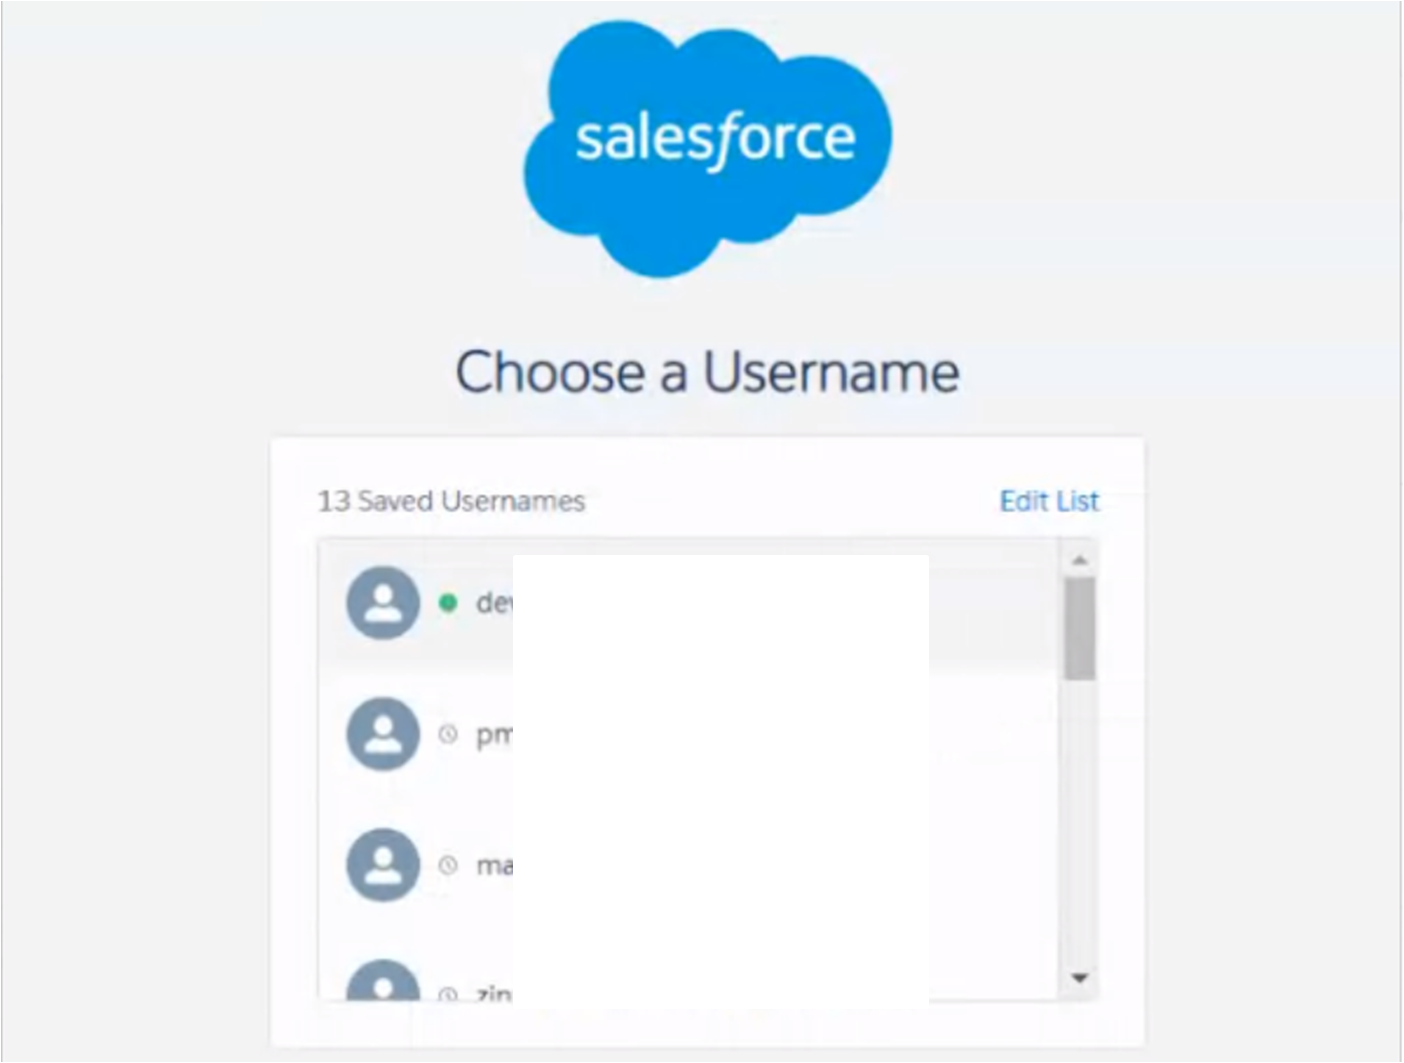
- Click Allow to grant access for the Marketing Cloud API User to access the Salesforce Sales Cloud org.
Note: You just created the handshake between Marketing Cloud and your Salesforce Sales Cloud org. That established a connected app relationship inside Salesforce Sales Cloud.
Finalize Configuration
It’s time to finalize the configuration of the connected app settings in Salesforce Sales Cloud. Log out of Marketing Cloud and log back in to your Salesforce Sales Cloud account with your personal admin credentials to make these next updates.
- In Setup, type "Connected Apps" in the Quick Find box and click "Connected Apps."
- Click "Salesforce Marketing Cloud."

- Click "Edit Policies."
- Under "Permitted Users", select Admin approved users are pre-authorized.
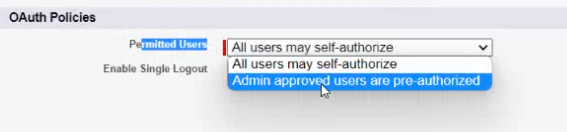
- If a warning message appears, click OK.
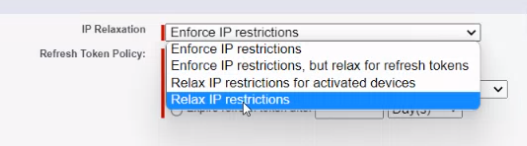
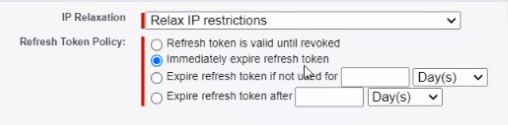
- Under IP Relaxation, select Relax IP Restrictions.
- Under Refresh Token Policy, select "Immediately expire refresh token."
Pause for effect.
What did those steps do?
These two steps are needed for ease of use and authentication within connected applications.
Note: Check out Connected App IP Relaxation and OAuth 2.0 Asset help pages for detailed information about these steps.
- Click Save.
- Scroll down the page and click Manage Permission Sets.

- Choose the permission set for the Marketing Cloud Connected App that you made in the last unit.
- Click Save.
Complete the Managed Package Configuration
Next, stay in the Setup screen to finish the Managed Package configuration.
- Type "process automation" in the Quick Find box and select Process Automation Settings.
- If the Default Workflow User is empty, click the lookup icon and specify a user with System Administrator permissions to be the default workflow user. (We suggest using the newly created CRM API user account.)
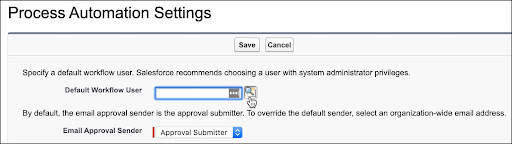
- Click "Save."
Note: This is an important step; skipping it prevents the managed package wizard from properly configuring workflow rules.
Session Settings
- Next, type "session settings" in the Quick Find box and click Session Settings.
- Scroll to the bottom of the page and click "Save."
Note: You don’t actually change any settings, but this is a necessary step for the configuration. If this step is not performed, the managed package wizard is not able to add IP allow listing.
Marketing Cloud Connector Setup Wizard
Now it’s time to connect your accounts using the setup wizard.
- From the top navigation, click the plus icon to navigate to the All Tabs screen.
- Click "Marketing Cloud."
- Click "Verify Remote Site" from the popup screen.
- Click "Okay" on the next popup about the MetadataAPI.
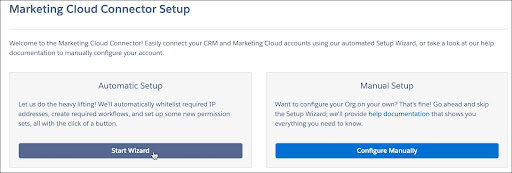
- Click "Start Wizard" to begin the setup wizard.
- The next screen is a prompt for the Default Workflow User you created. Click Next.
- Click Next to move forward and acknowledge you’ve saved the session security settings.
- Click Next to acknowledge field-level security information.
- Click Done to acknowledge the page layout update information.
- At the main Marketing Cloud Connector Setup screen, select I agree to acknowledge the automated changes, and then click Configure Marketing Cloud Connector.
- If all goes well, you are rewarded with a configuration summary.
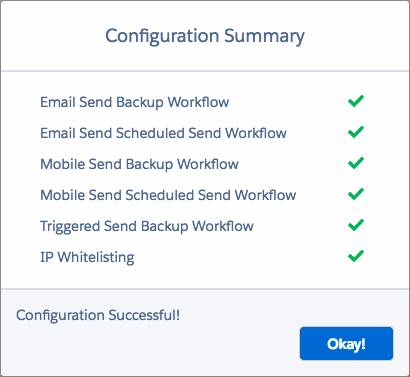
- Click "Okay" to finish the setup wizard.
Connect to Marketing Cloud Within Salesforce Sales Cloud
Next, it’s time to configure settings for the integration and make the connection in your Salesforce Sales Cloud account.
- Click the plus icon to navigate to the All Tabs screen.
- Click "Marketing Cloud."
- Click "Connect to Marketing Cloud."
- Enter the username and password for the "Marketing Cloud API User."
- Click "Login."
- If successful, you see a screen to configure Marketing Cloud Connect settings. Under the Account section on the page, select Email.
- In the Sends section, select all options.
- In the "Notifications" section, enter the appropriate email address to get error messages from Marketing Cloud Connect.
- In the Tracking section, select appropriate options for your organization about the specific email tracking data that Marketing Cloud sends to the Salesforce Sales Cloud system. Keep in mind that the choices you make for these can affect the overall storage of your Salesforce Sales Cloud org.
- Leave the defaults for the rest of the settings and finish by clicking Save Settings.
- Select at least one business unit from the Business Unit Management screen and click Save.
Marketing Cloud User Integration
With the connection established in the Salesforce Sales Cloud system, we can now finish the Marketing Cloud user integration. Log out of Salesforce Sales Cloud and back into Marketing Cloud using your personal admin account.
- In Marketing Cloud, hover over your name and select Setup.
- Next, select Users under Administration.
- Click the name of the Marketing Cloud Account API user.
- Click Integrate in the Salesforce.com Status field on the user's general settings screen.
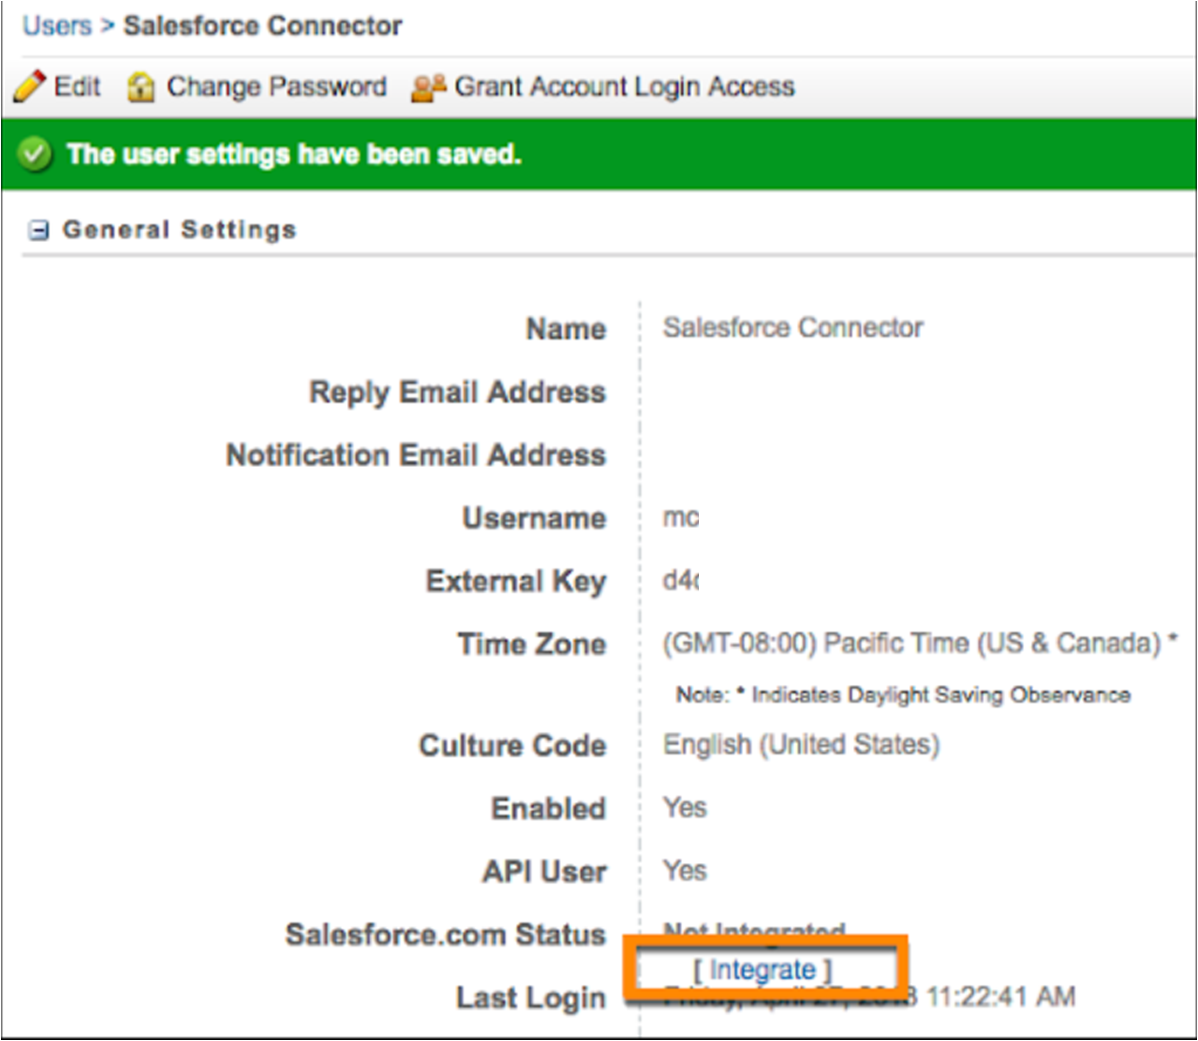
- Enter the username for the CRM API user and click Save Settings.
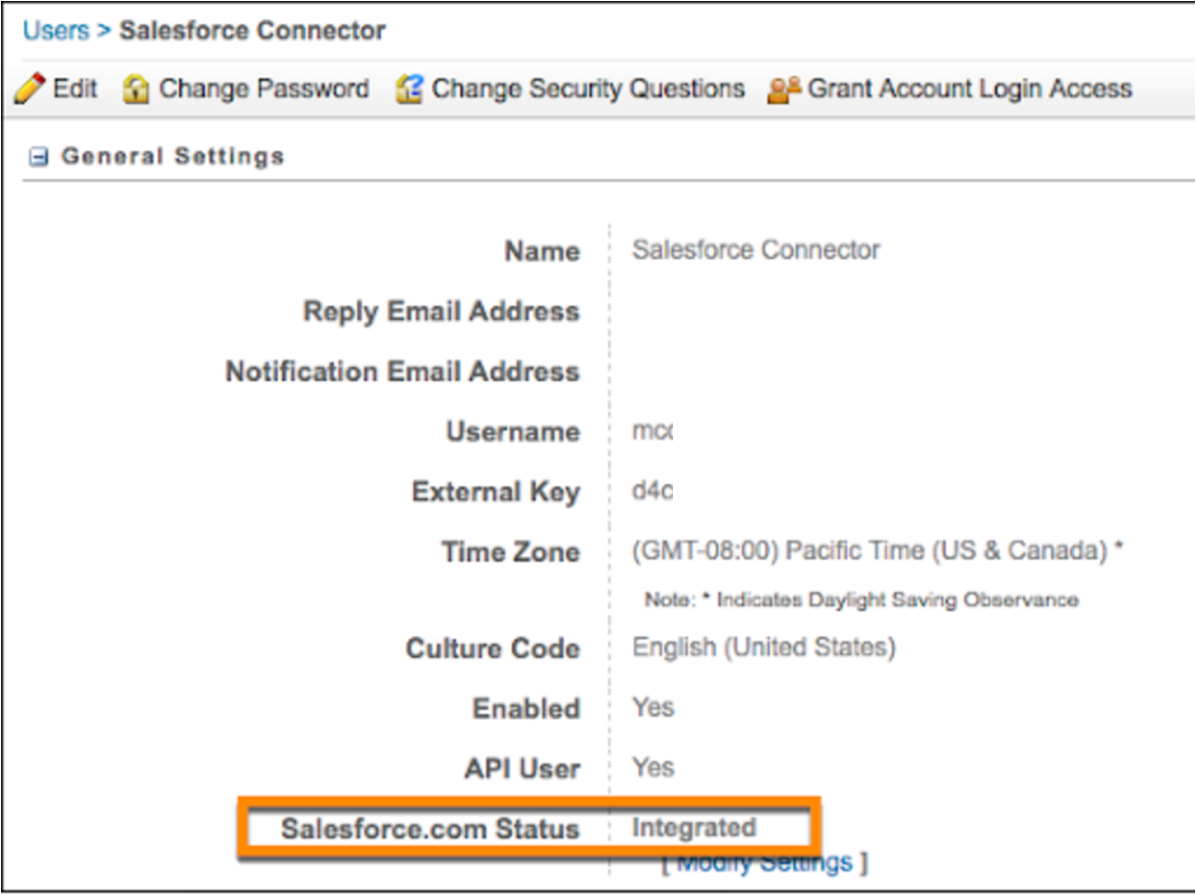
If successful, the Salesforce.com Status updates to Integrated.
Next we run through a scenario to test the connection and make sure everything is working properly.
Create Field Mapping
One of the coolest features of Marketing Cloud Connect is its automatic synchronization of data between Marketing Cloud and Salesforce Sales Cloud. To make this work, we need to configure some basic field mapping. We specify the relationships between subscribers in Marketing Cloud and the corresponding fields in the Lead and Contact objects in Salesforce Sales Cloud.
- Log into Marketing Cloud with your Marketing Cloud Connect API credentials.
- In Marketing Cloud, hover over Email Studio and click Email.
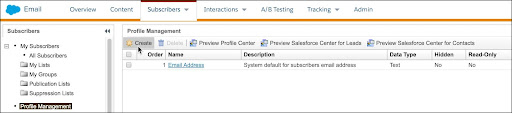
- Hover over Subscribers and select Profile Management.
- Click "Create."
- On the General tab, type your first name in the top text box.
- Click the Salesforce tab.
- Select the first name in the Map to Salesforce Lead Field picklist.
- Scroll down in the Map to Salesforce Contact/Account Field picklist to the Contact General section and select First Name. Select both checkboxes to display on the Salesforce Profile Center.
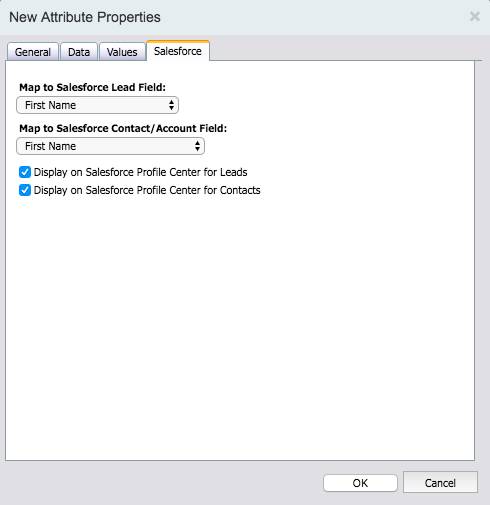
- Click "OK."
- Repeat steps 3–9 to create a second attribute, using the last name instead of the first name.
Marketing Cloud Connect setup is now complete.
Testing
Now that you’ve successfully set up Marketing Cloud Connect, let’s do a quick test to ensure everything is working properly. First, we build a basic email template in Marketing Cloud and then send an email to leads inside Salesforce Sales Cloud.
Create an Email in Marketing Cloud
Get started by creating a basic email template in Marketing Cloud Content Builder.
- In "Content Builder," click "Create."
- Select "Email Message" from the drop-down list.
- Below Define Properties, select "Text Only" from the drop-down list.
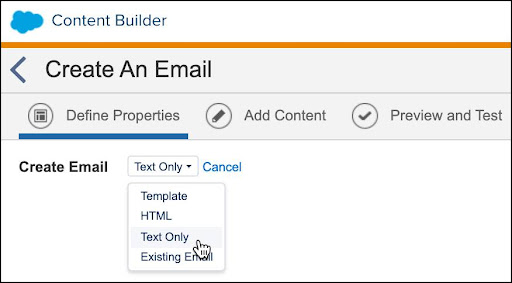
- In the Name field type MC Connect Test and then click Next.
- In the Subject field, type Marketing Cloud Connect Test Email.
- Paste the following code into the body and then click Save and Exit.
- Dear %%First Name%% %%Last Name%%,
- System attributes (%%jobid%%, %%memberid%%)
- Forward to a Friend: %%ftaf_url%%
- Update Your Profile: %%profile_center_url%%
- This email was sent by:
- %%Member_Busname%%
- %%Member_Addr%%
- %%Member_City%%, %%Member_State%%,%%Member_PostalCode%%,
- %%Member_Country%%
Create a Test Lead in Salesforce Sales Cloud
Now that we have an email created in Marketing Cloud, we need to create recipients in the Salesforce Sales Cloud environment to send our test message.
- Log out of Marketing Cloud and log in to your Salesforce Sales Cloud account.
- Select Leads in the navigation bar.
- Click "New."
- Fill out First Name, Last Name, Company, and Email Address with something memorable—you can use your name and company, for example. Ensure the email address you use is one that you have access to so you can view the test email.
- Click Save.
Create Test Lead Report
- Navigate to Reports from the All Tabs page.
- Click "New Report."
- In the Select Report Type section, click "Leads," then click "Create."
- Enter ID in the Quick Find text box.
- Double-click the lead ID to add it as a column in the report.
- In the Show picklist, select All leads.
- Next to Filters, click Add. A new filter appears below the date field.
- Click the down arrow and scroll down the picklist to select Email.
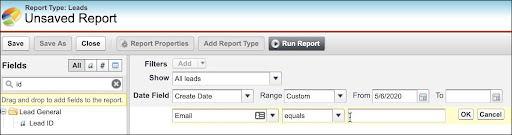
- Leave the operator as equals, and then enter the email address you specified when you created the test lead.
- Click OK.
- Click Run Report. You should see a single result: the test lead that you created.

- If the report looks as expected, click "Save As."
- Name the report "MC Connect Leads Test" and save it in the Marketing Cloud Admin report folder.
- Click "Save."
Send a Test Email from Salesforce Sales Cloud
Now it’s time for the real test. Here’s how to send that Marketing Cloud–generated email from within the Salesforce Sales Cloud org.
- In Salesforce Sales Cloud, click the plus icon to navigate to the All Tabs screen.
- Click "Marketing Cloud."
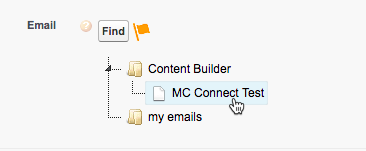
- Click "Find."
- Click "Content Builder" and select the MC Connect Test email template you created.
- Click "plus" sign the Recipients section of the form.
- Select the Marketing Cloud Admin Reports folder.
- Select the MC Connect Leads Test.
- In the From section of the form, select the desired value. Since this is a test email, any option is fine.
- Select the checkbox next to I certify that all of these people have opted in (required).
- Click Send.
The email is now queued for sending. Even though the default setting is immediate send, it can take up to an hour to see the email in your inbox. Marketing Cloud is designed for sending email to millions of subscribers at once, so there are a number of asynchronous processes and queues involved in this simple test. In other words, don’t worry if the email doesn’t show up right away.
When it does, if everything is set up properly, the test email arrives in your inbox with the first name and last name populated, along with other details from the email.
Marketing Cloud Connect Is Connected!
Cue the confetti—you have successfully set up Marketing Cloud Connect for your account.
When you are ready to deploy Marketing Cloud Connect to your users, be sure to:
- In Salesforce Sales Cloud: repeat steps to assign proper page layouts and permission sets to users who plan to use Marketing Cloud Connect.
- In Marketing Cloud: Integrate all users needing access to both systems.
Updated 3 months ago