
Member Management
This document will guide you through managing members in Zinrelo admin console.
The Zinrelo admin console provides an intuitive and user-friendly experience, enabling administrators to manage loyalty programs efficiently. A key feature supporting this goal is the dedicated member page within the console. Administrators can easily navigate to the 'Members' section to view, customize settings, and analyze member behaviors.
In this document, we will explore the features of the Member Management attribute within the Zinrelo admin console. We will explore how each capability can enhance your loyalty program and help you build lasting relationships with your members.
How to use a member page to grow your business?
The member page serves as a centralized hub that allows you to view and manage all aspects of your members' data in one convenient location. By leveraging the insights provided through this platform, you can uncover valuable trends, evaluate the effectiveness of your loyalty initiatives, and make informed decisions that enhance your offerings.
How to access the member section with Zinrelo admin console?
To access Member section within Zinrelo admin console, follow the given steps:
- Login to your Zinrelo loyalty store.
- Navigate to the “Members” tab.

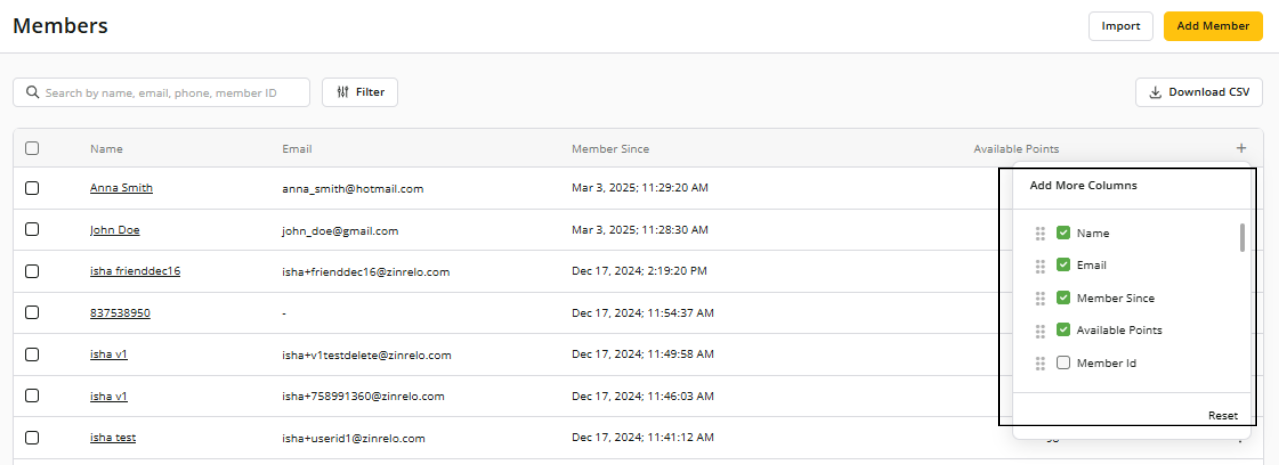
What will you see on the members listing page?
The Members page provides a comprehensive list of all members enrolled in your loyalty programs. It displays essential information, like member names, email addresses, available points, and the date and time of their program enrollment.

Customize Your Member Page
You can enhance your visibility by selecting and rearranging the columns that matter most to you. To customize your view, simply click the plus sign (+) and choose the desired columns from the available options.
Member Search Functionality
Finding a specific member is straightforward. Use the search function to look up members by name, email address, member ID, or phone number.

Filtering Members
You can utilize filters to view and manage specific groups of members. For instance, you can effectively segment your members by applying criteria such as "enrollment date" and “tier.”

Tip:Consider adding tags to these targeted members to better organize your promotional campaigns. This approach not only encourages purchases but also motivates members to upgrade to higher tiers. By strategically utilizing filters in this manner, you can significantly enhance engagement and foster loyalty within your program.
Additional Member Management Activities
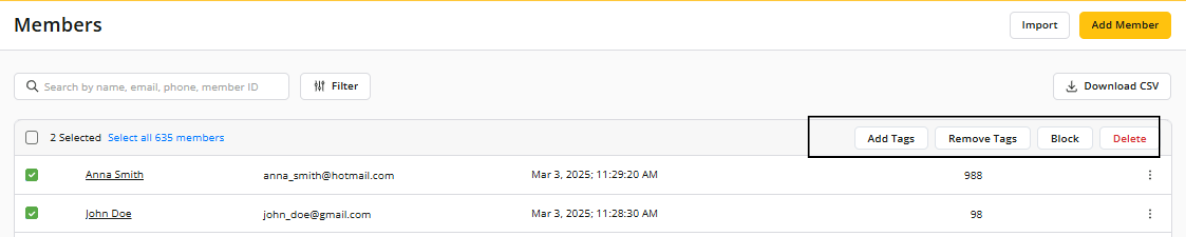
You can engage in various member management activities, including adding or removing tags, and blocking or deleting members. To take action, select the member(s) you wish to modify:
- Add Tags: Create one or more tags for members, allowing you to group them for future promotional activities.
- Remove Tags: Remove any assigned tags from the member.
- Block: If you see any suspicious activity from a member, you can permanently remove that member from the loyalty program. Once blocked, the member cannot rejoin the program.
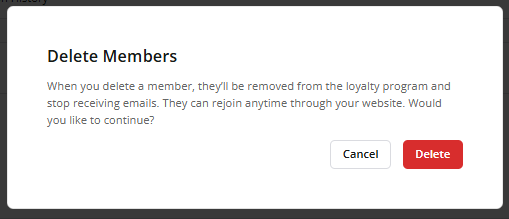
- Delete: You can delete a member from the member list if that member is no longer associated with your loyalty program. Deleted members can rejoin the loyalty program through your website.
How to add new members to loyalty program?
There are two methods for adding members to your loyalty program via the admin console. The right method for you will depend on your specific needs and the size of your member list.
“Add Member” feature in admin console
If you wish to add few members to your loyalty program, you can add them through “Add Member”. For this follow the given steps:
- Click on “Add Member.”

- Add member details:
Member Attributes | Description | Example | Mandatory |
|---|---|---|---|
Member ID | Enter a unique identifier for the member. For examples: “Customer ID”, “GUID”, “Email Address”, “Phone Number”. | mem@1234p | Yes |
First Name | Enter the first name of the member. | John | No |
Last Name | Enter the last name of the member. | Doe | No |
Email Address | Enter the email address. | Yes (when email address is set as a primary identifier) | |
User ID | Enter the User ID. | john2658doe | No (this field will only be visible when the email address is set as the primary identifier). |
Mobile Number | Mobile number of the loyalty member. | +1-7203332525 | No |
Date of Birth | Enter member’s date of birth. | 1989/08/26 | No |
Date of Anniversary | The anniversary date for the loyalty member can either be their wedding anniversary date or their enrollment anniversary date. If you wish to set the "Enrollment Date as Anniversary Date," please get in touch with your account manager at [email protected] . | 2022/09/31 | No |
Member Tags | Assign the member tags to the member. | enrolledmember | No |
Twitter Handle | Enter twitter handle. | No | |
Custom Attributes | You can update custom attributes explicitly tailored for members, provided those attributes have been created. | Location: Canada | No |
Please Note:
- By default, the email address is set as the primary identifier. If you wish to make the member ID the primary identifier, please write to your account manager at [email protected].
- If a member with the new Member ID already exists, the data from both accounts will be merged. A delete webhook event will be triggered for the old member account upon successful merge.
- Tags, email address and custom attributes from the new account will take precedence during the merge.
- Any transactions associated with the current member will be transferred to the account corresponding to the new Member ID.
CSV file
This method is ideal for adding multiple members at once, especially if you have an extensive database. You can prepare a CSV file with the required member information and import it easily.
To understand the process of importing members to the loyalty program, refer to this help document.
To know all effective ways of adding new members to the loyalty program, refer to this document.
Download CSV
You can download a CSV file containing all members or filtered members' details. This file will be sent to the specified email address.
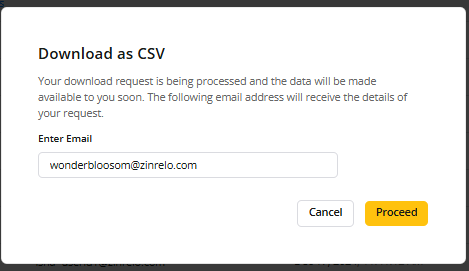
The CSV includes comprehensive information about each member, including their first name, last name, address, phone number, points information, tier status, and more.
How to access member details page?
To access a detailed view of a member’s transactions and activities, click on the member's name.

Profile Summary
In the profile summary, you can have a comprehensive overview of the member's information, which includes:
- Basic Information: Here you can have a key personal details about the member like member ID, first name, last name, email address, etc. You can edit the member details by clicking on the edit button.

- Tags: You can assign or remove tags for member segmentation and targeted promotions.

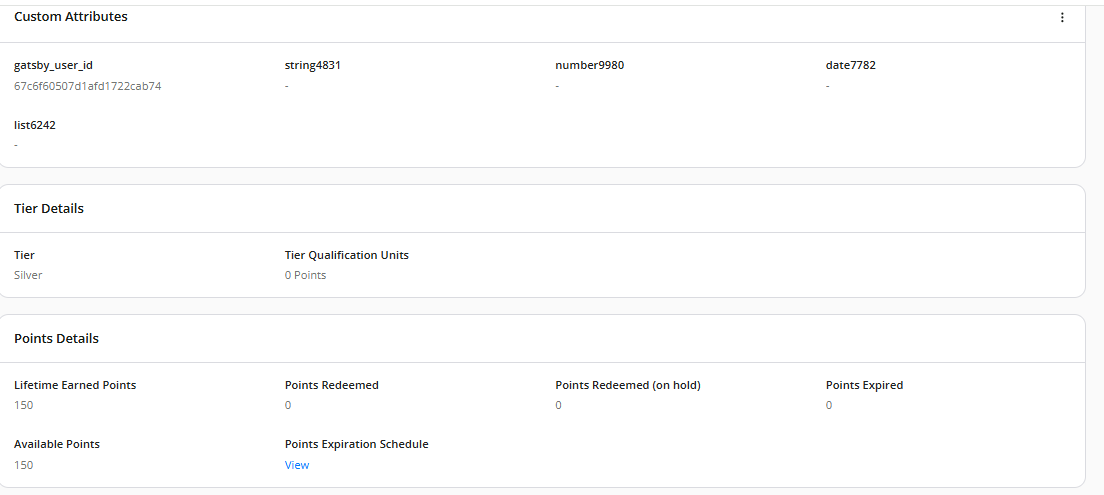
- Custom Attributes: Here you can have a comprehensive view of all custom attributes created for the member.

You can edit the attributes for clicking on the edit button.

- Tier Details: Here you can view the member's current tier status and qualification unit information.

- Points Details: This section provides a detailed breakdown of the member’s points: The section is detailed below:
- Lifetime Earned Points: Total points earned by the member over time.
- Points Redeemed: Total points redeemed by the member.
- Points Redeemed (On Hold): The pending redemptions awaiting for approval.
- Points Expired: Points that have expired.
- Available Points: The member’s current available balance after all deduction, redemptions and returns.
- Points Expiration Schedule: View upcoming points expirations. Click on the hyperlinked text “View” for a detailed look.

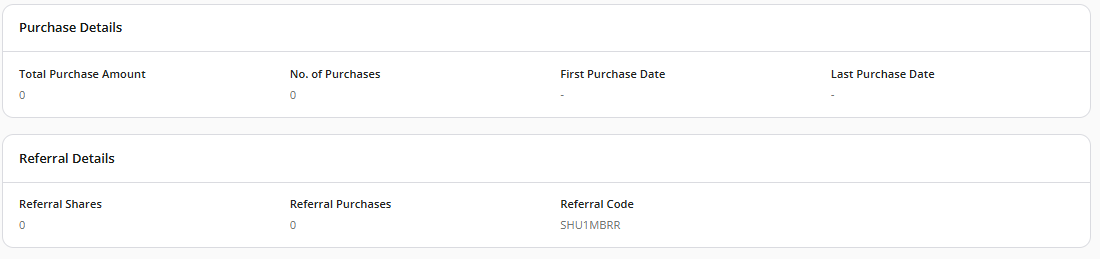
- Purchase Details: In this section, you can access details of all purchases made by the member.
- Total Purchase Amount: Total amount spend by the member on the purchase.
- No. of Purchases: Total number of purchases made by a member.
- First Purchase Date: The date of first purchase made by the member.
- Last Purchase Date: The date of last purchase made by the member.

- Referral Details: Here, you can have referral information. This includes:
- Referral Shares: Total number of referral made by the member.
- Referral Purchases: Total purchases made by the referred friend.
- Referral Code: The unique referral code for the member. This code can be used by the member to refer a friend and earn points for referral.

Actions

Through these administrative actions, you can manually award, redeem, or deduct points, delete or block members, unsubscribe them from the email list, and perform various other tasks, such as manually submitting receipts. These actions are particularly useful in scenarios such as automatic points failures, fraud detection, or assisting members facing redemption issues.
The following sections outline these actions in detail:
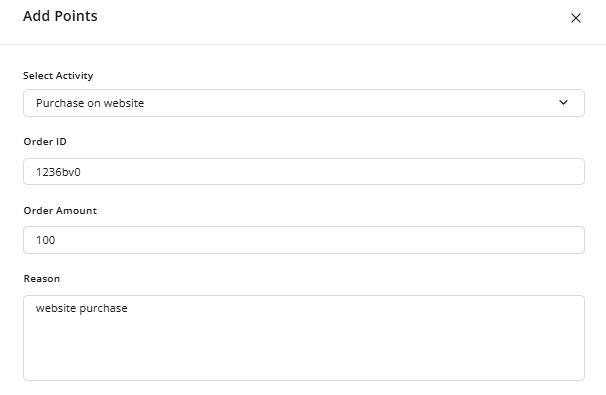
- Add Points: Manually award members for any activity. For example: Your customer service team identified a frustrated client due to a delay in delivery. As a gesture of goodwill, you can award points to the member. To do this, you need to provide the following details:
- Select Activity: Choose the activity for which points should be added.
- Points: Enter the number of points to be awarded.
- Reason: Provide a reason for the transaction to ensure proper record-keeping.
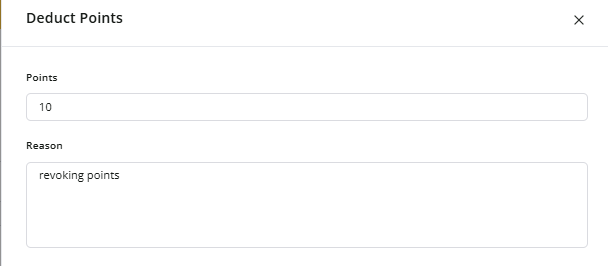
- Deduct Points: Manually deduct points from a member’s account to correct errors or revoke points from invalid transactions. To do this, you need to provide the following details:
- Points: Enter the number of points to be deducted.
- Reason: Provide a reason for this adjustment.
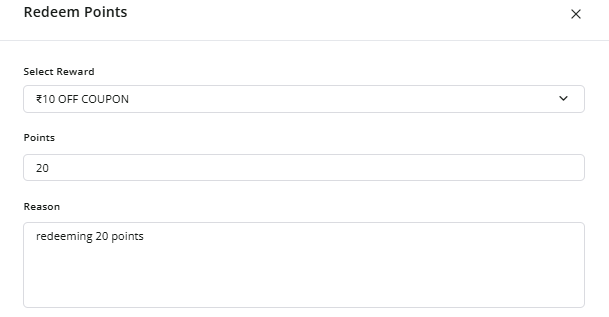
- Redeem Points: If a member is unable to redeem points due to system errors or other issues, you can manually redeem them. To redeem points for a member, you need to provide the following details:
- Select Reward: Choose the reward to be redeemed.
- Points: Enter the number of points to be redeemed.
- Reason: Specify the reason for manual redemption.
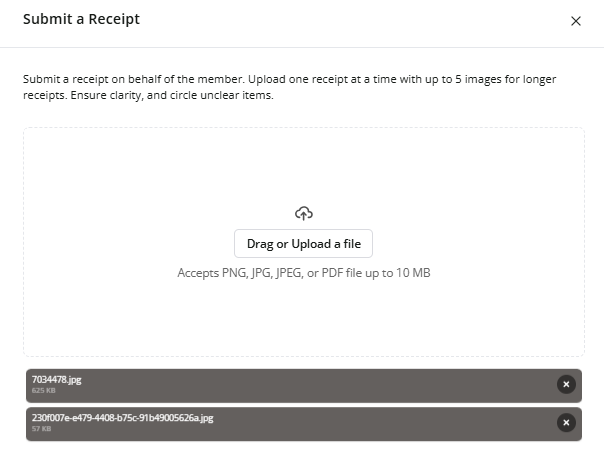
- Submit a Receipt: You can manually upload a receipt on behalf of a member. The submitted receipts will be forwarded for moderation and review.
- Email Unsubscribe: You can unsubscribe a member from the mailing list, thereby respecting their preferences and ensuring compliance with communication regulations.
Please Note: You can only unsubscribe from emails sent by Zinrelo.
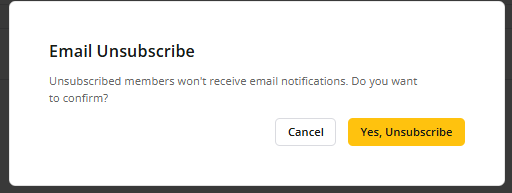
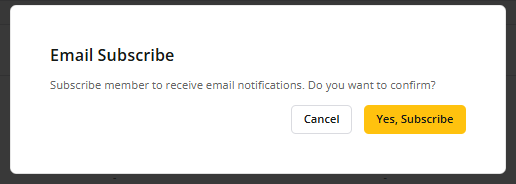
You can re-add the member to the emailing list by subscribing again.
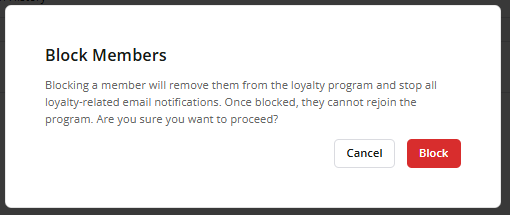
- Block: If you observe any suspicious activity from a member, you have the option to permanently block that member. Once blocked, the member cannot re-enroll in the program.
Please Note: When a member is blocked, all their accumulated points are deducted from their account, ensuring they can no longer access any rewards or benefits associated with their points balance.
- Delete: If a member is no longer associated with your loyalty program, you can delete them from the member list. However, you can re-add this member to the program at any time if business needs arise.
Transaction History
You can access a tabulated view of all transactions made by the member with date, action, details, and status of the transaction. These fields are elaborated below:
- Date: Displays the date when the transaction was made.
- Action: Indicates the type of transaction, such as points redeemed, deducted, or earned. The values could be Reward, Points Earned or Deduct.
- Details: Provides a brief description of the transaction. For more information, click on Transaction Details to view a detailed breakdown.
- Status: Shows the current status of the points. The values could be Approved, Pending, Deducted, Cancelled or Redeemed.

Updated 2 months ago