
Streaks
The Power of Streaks in Driving Customer Loyalty
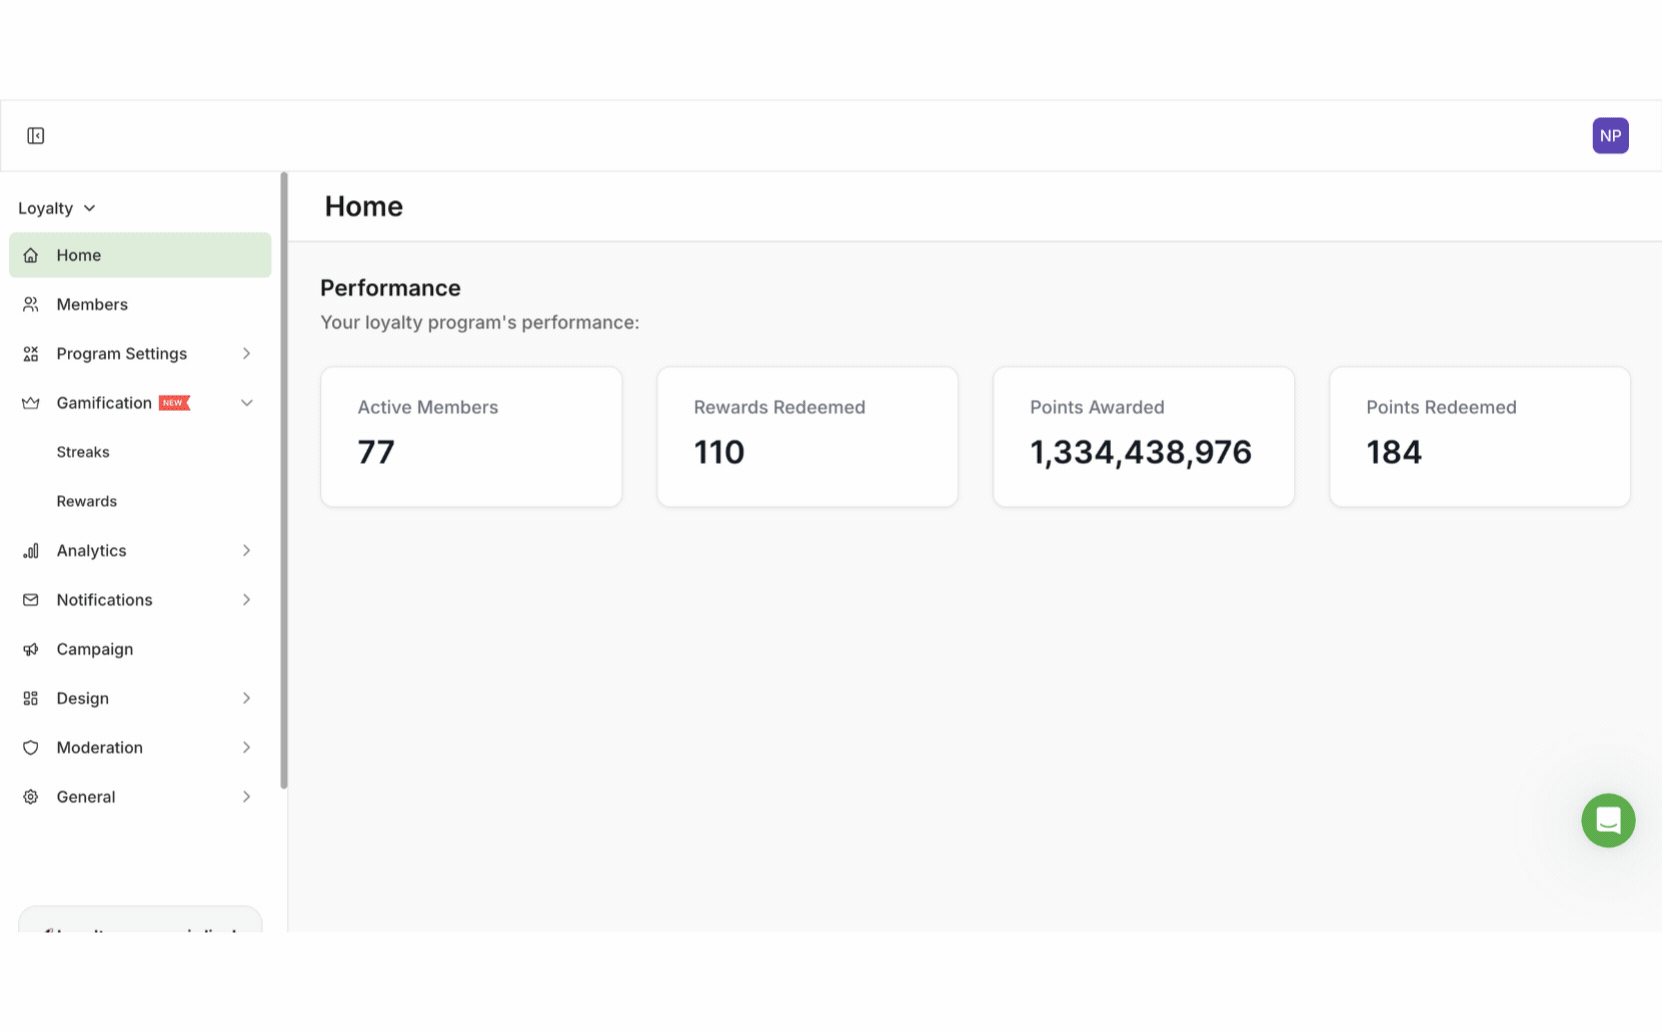
Streaks are a powerful gamification tool that encourages ongoing customer engagement by rewarding consistent behavior over time. Zinrelo’s Streaks feature tracks when users complete key actions, such as making a purchase, uploading a receipt, or logging in, over set intervals like days, weeks, or months. The goal is to inspire users to stay active and build positive habits. Maintaining a streak adds a sense of momentum and accomplishment, which strengthens motivation and fosters long-term brand loyalty.
The Power of Streaks in Driving Customer Loyalty
Here’s how gamification strategies such as streaks can effectively scale your loyalty program:
- Driving Consistent Engagement – Encourages frequent brand interactions.
- Creating Urgency – Nudges users to act before a streak expires.
- Boosting Retention – Builds habit-forming behavior for long-term loyalty.
- Gamifying the Experience – Adds fun, interactive challenges.
- Fostering Achievement – Motivates users with progress tracking and milestones.
How to Set Up a Streak
Step 1: Create a New Streak
- Log in to your Zinrelo admin console.
- Navigate to Gamification > Streaks. This will open the Streaks dashboard where you can create, manage, and track streaks.
- Click Create Streak.
- Fill in the following details:
- Name: Provide a name for your streak.
- Description: Add a description explaining the goal of the streak.
- Click Save.
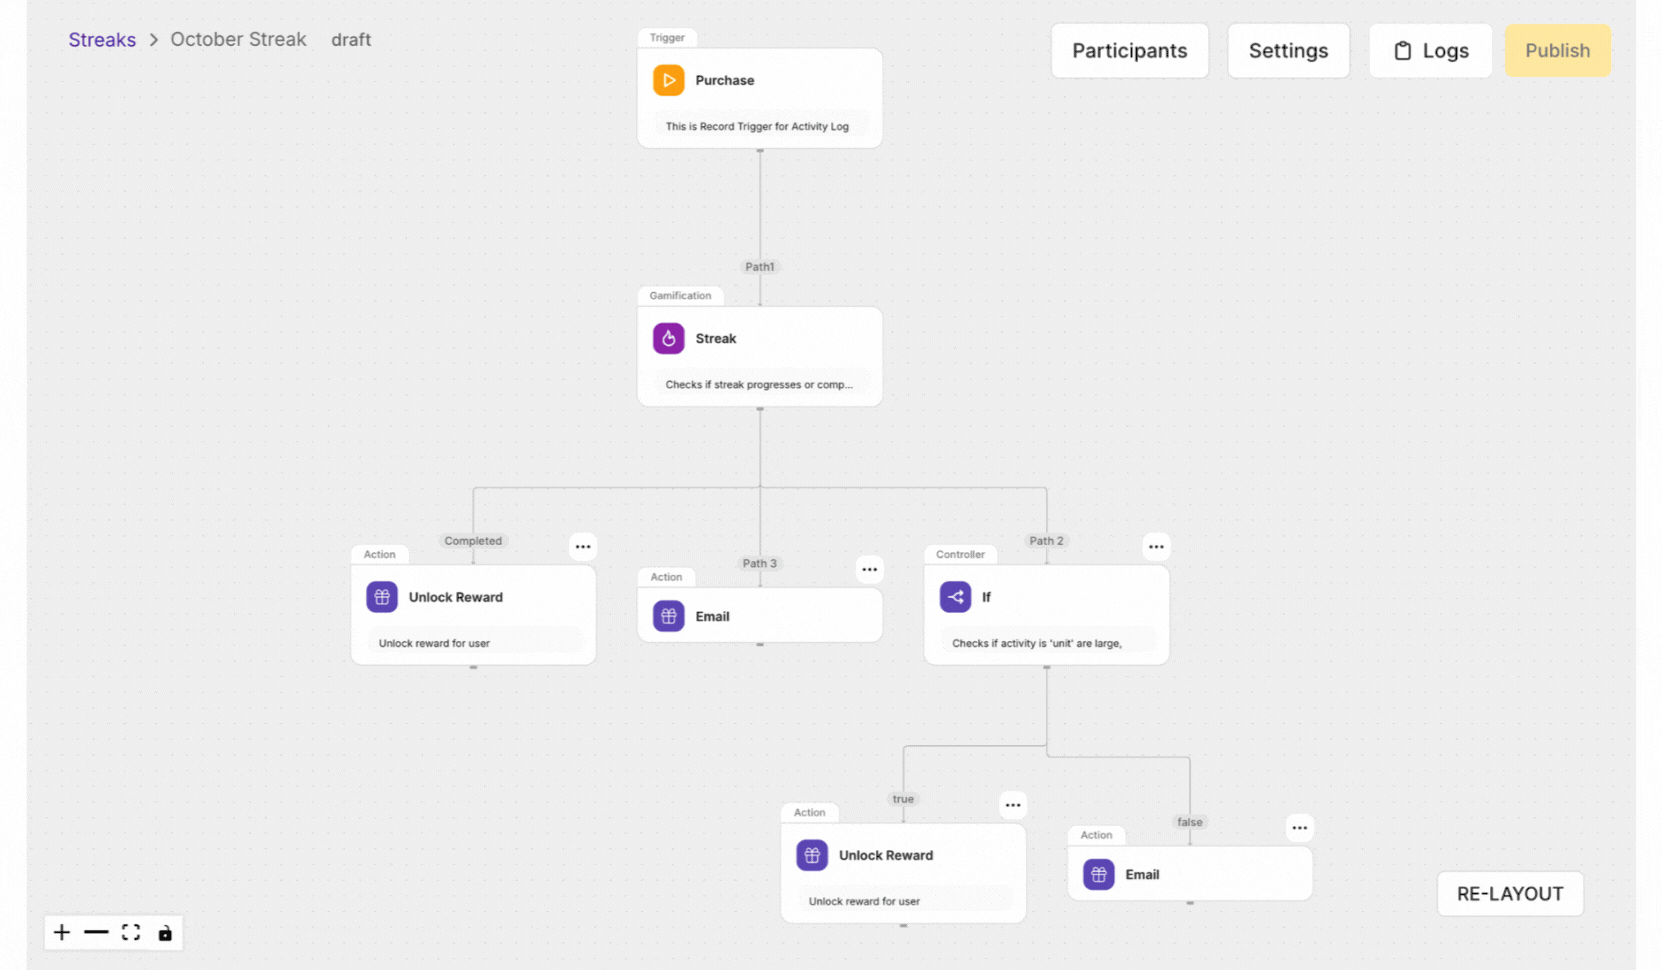
This opens the workflow builder, where you will set up the streak's trigger and tasks.
Step 2: Add a Trigger
- Click on Record Trigger.
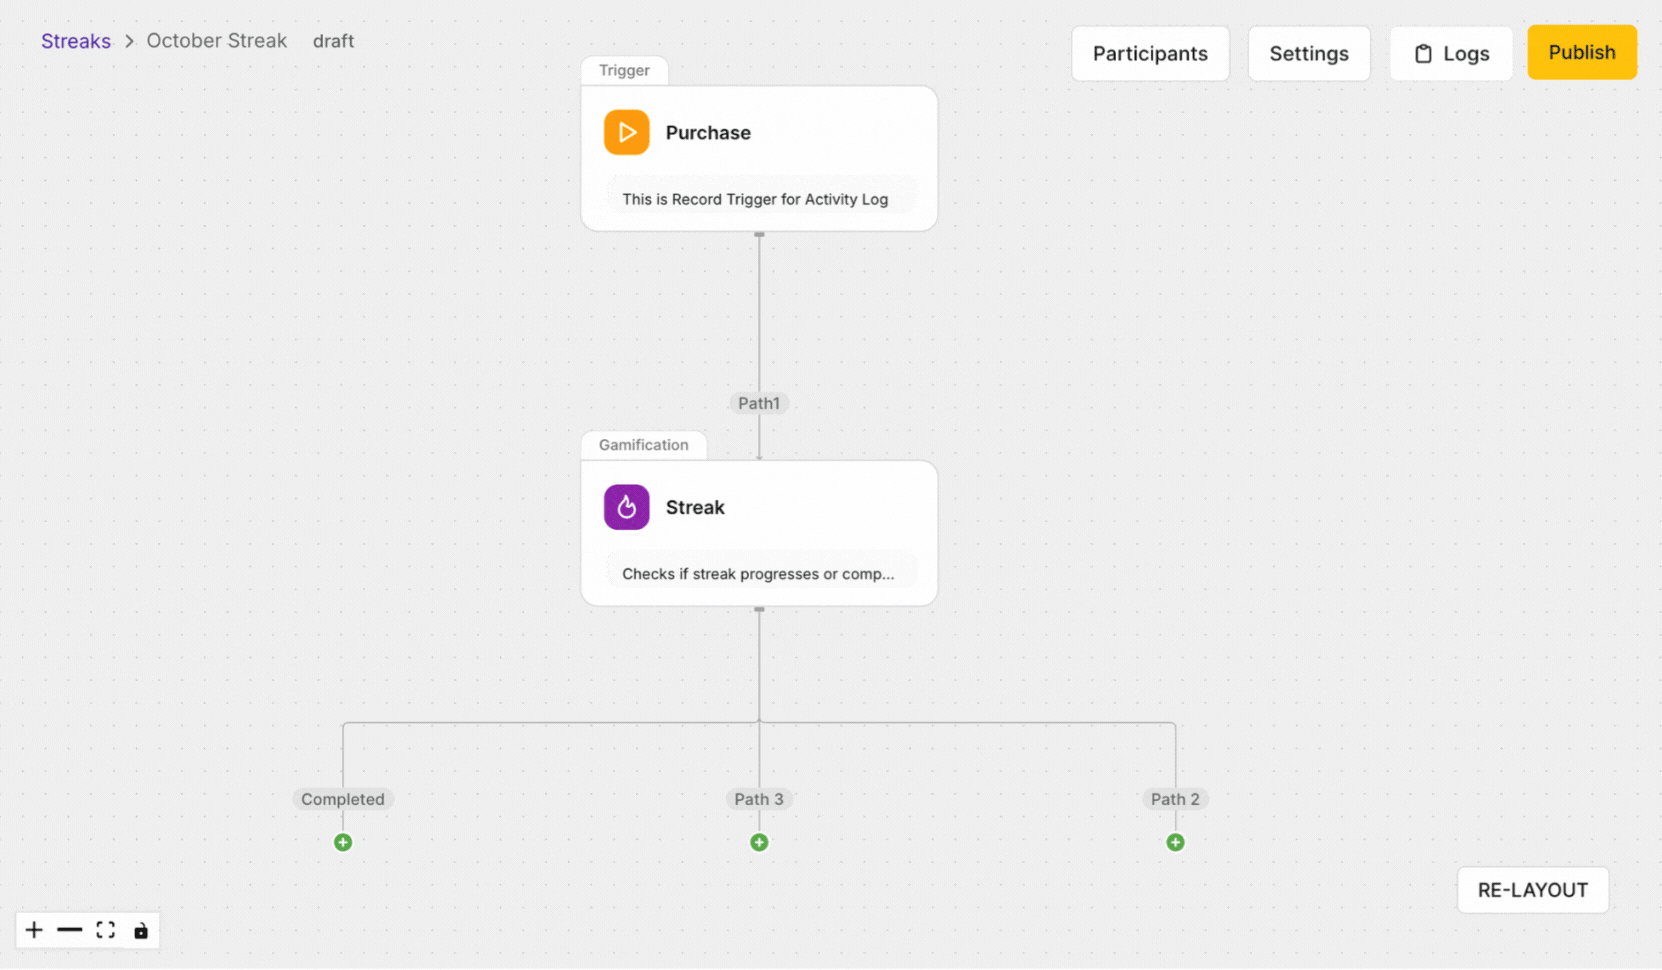
- In the trigger setup window, select the qualifying event from the dropdown. Currently, these are:
- Purchase
- Referred a Friend
- Share on Facebook Event
- Share on Twitter Event
- Share on Pinterest Event
- Write a Review Event
- Receipt Submitted
- Receipt Approved
- Receipt Rejected
- Follow on Instagram Event
- Upload a Photo
- Code Submission Event
- Redeemed Points Rollback Event
- Member Account Created
- Member Account Created with Referral
- Member Account Updated
- Member Account Deleted
- Choose the trigger criteria. For this example, we have chosen Purchase.
- Update the filter to refine who qualifies:
- Choose Match All or Match Any. In this example, we have chosen Match All
- Choose a condition criterion from the dropdown list to refine who qualifies. The filters will vary based on the initial trigger picked. In this example, we have chosen the Sum Of Purchase Amount.
- Set the comparison filter. In this example, we have chosen Greater than or equals 50.
- You can add multiple conditions for the trigger if you want the member to hit multiple criteria or if you want to include in the same streak for different actions.
- Click Save once you have finalized your trigger and its conditions.
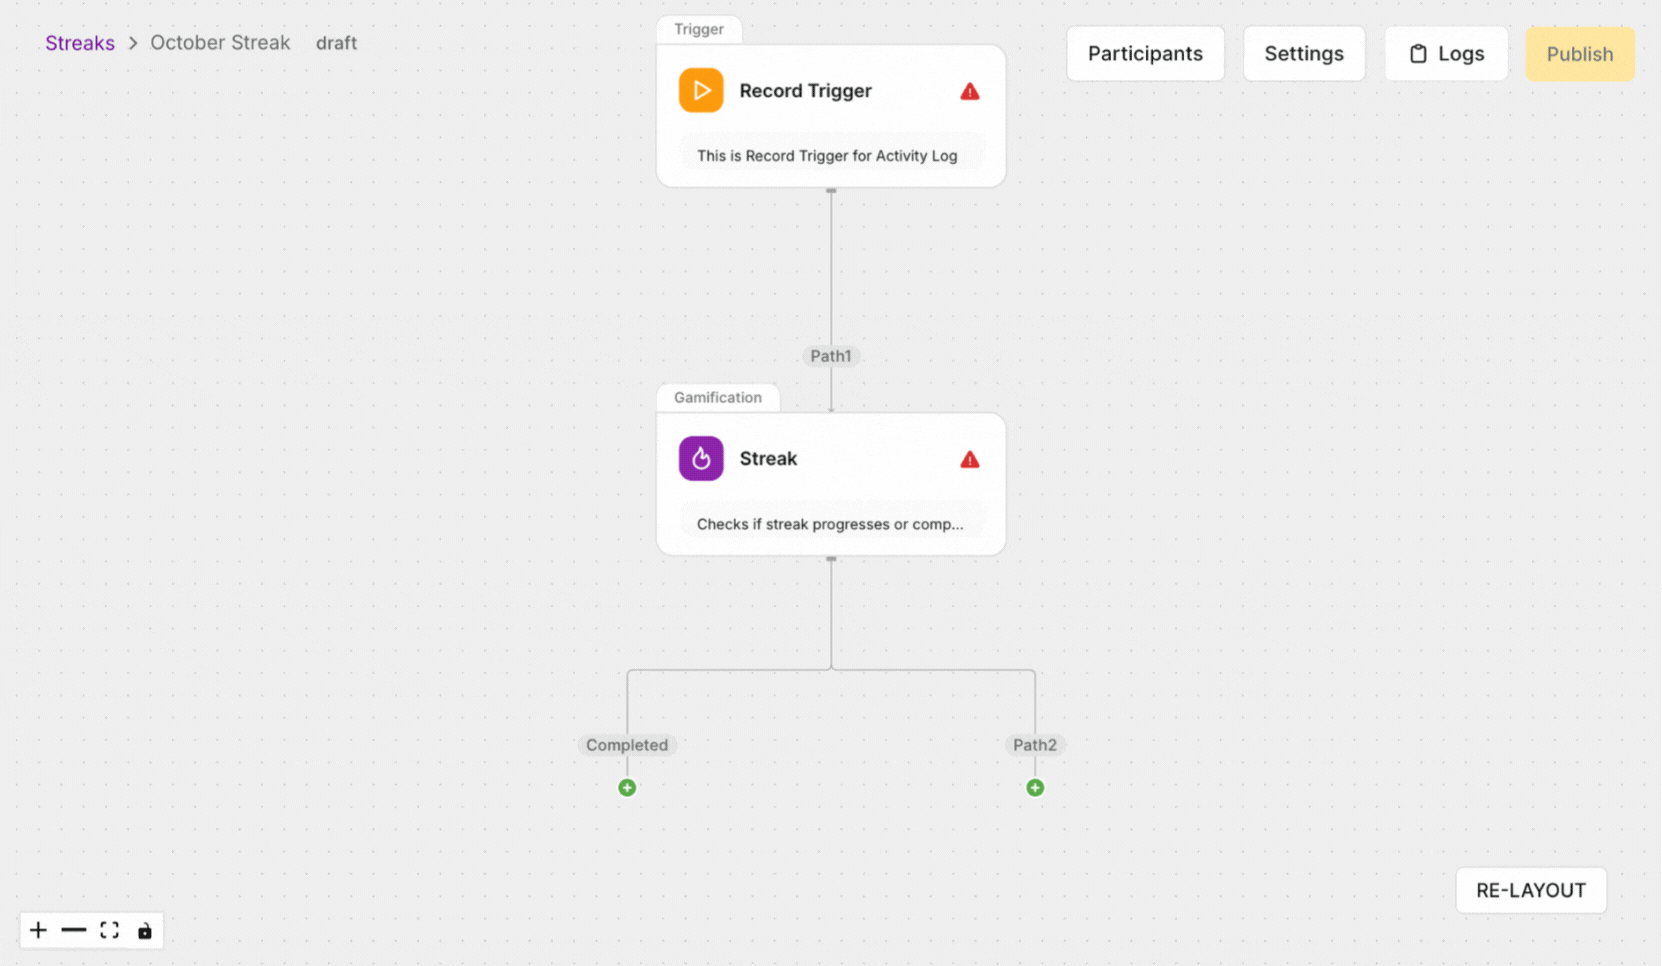
Step 3: How to Set Up the Streak with Conditional Logic
To manage tasks effectively within a streak system, you’ll need to define what counts as completing a task and use conditional logic to guide progression or fallback outcomes. Streaks work by tracking consistent member behavior over time, and rewards are given when the streak is successfully completed. If the streak is broken, the member is rerouted to an alternative path.
- Click on the Streak element in the workflow.
- Choose the metric to track, which are currently:
- Sum of Purchase Amount
- Count of Purchases
- Set the comparison filter. In this example, we have chosen Count of Purchases and Greater than or equals 1
- In our example, the duration is set to 3 months. This means if a member makes one or more purchases per month for 3 consecutive months, they will complete the streak. Their task is marked as Completed
- Else Path (Path 2):
If the member fails to meet the streak condition (misses a month), their streak is broken and they move to Path 2. This defines an alternate outcome, helping you respond to different behaviors. - Else If Path (Path 3):
You can also create partial reward paths. In our example, if the task is done for 1 consecutive month, the member moves to Path 3. This allows you to acknowledge progress or give further encouragement if the full streak hasn’t been completed (yet). This “if/then/else” framework creates a dynamic and flexible streak system that can adapt to varying levels of engagement. It helps ensure members are rewarded appropriately based on consistent participation, while also providing meaningful outcomes when the ideal behavior isn’t fully met.
- Else Path (Path 2):
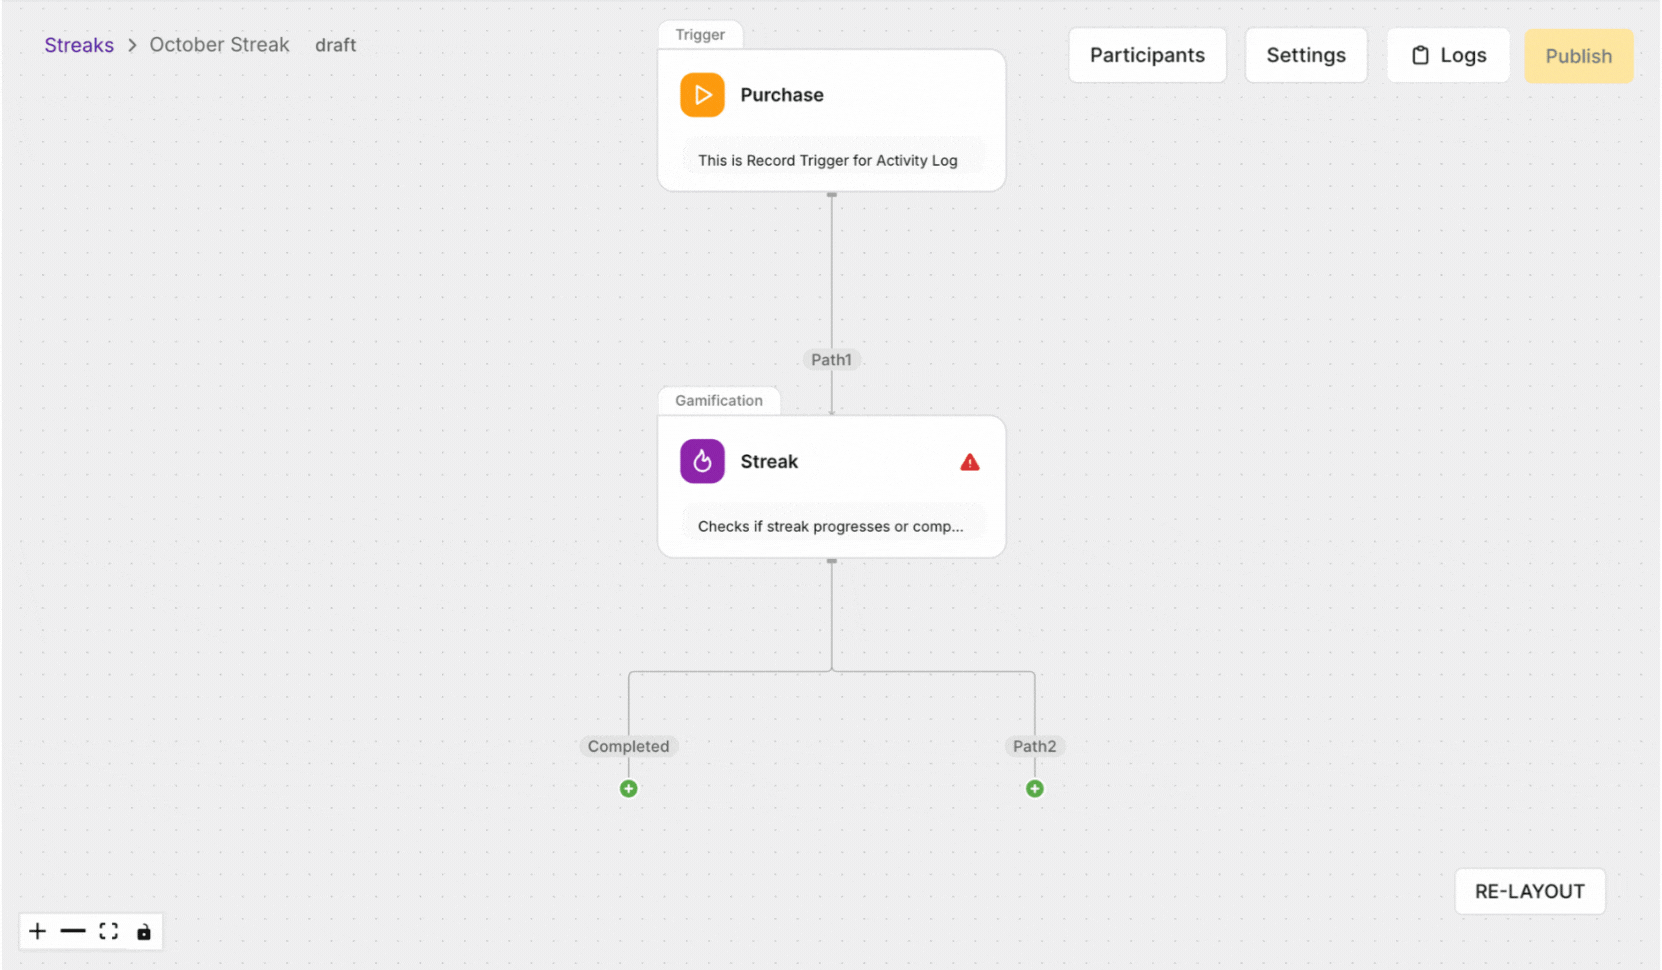
Step 4: How to Set Up the Paths
To effectively manage tasks within a streak system, it's essential to establish clear definitions and
conditions for task completion. When a member successfully completes a defined task, their streak will
be marked as “complete”, and they will be eligible for a reward. You will always have at least two paths to configure. Completed, Path 2, and any other paths that have been added via the Else If condition in the Streak Element.
- Click on the plus sign for the path you want to configure.
- You will see three options:
- Unlock Reward
- Conditional Split
To Configure the Unlock Reward element
- Click on the Unlock Reward element to configure the reward.
- Click on Create Reward or one that has already been created
- To Create a Reward, you need to fill in the details to create a reward:
- Reward Type: Choose from the following reward types:
- Fixed Amount Discount – A set discount applied to the order subtotal.
- Percentage Discount – A percentage-based discount on the order subtotal
- Free Shipping – Shipping charges are waived for the member.
- Reward Name: Assign a name to your reward.
- Reward Tile Image: Upload an image to make the reward visually appealing.
- Fixed Amount Discount: Specify the amount deducted from the member's points upon redemption.
- Reward Type: Choose from the following reward types:
- Click Save to enable the Design Configuration and Manage Code sections.
- Click on Design Configuration
- Customize how the reward appears in the End User Dashboard:
- Title: Assign a title to the reward.
- Description: Provide a brief explanation of the reward for the end user.
- Confirmation Message: Customize the confirmation pop-up message.
- Confirm Button Label: Set the text for the confirm button.
- Cancel Button Label: Set the text for the cancel button.
- Claim Button Label: Customize the text for the claim button.
- Post-Claim Button Message: Define the message displayed after a reward is claimed.
- Click Save to update your changes
- Then proceed to Manage Codes section
- Click on Add Codes
- Enter the codes and click Save.
- All coupon codes will be listed in Manage Codes page. You can track who claimed the reward, when it
was claimed, and when it was redeemed. - Go back to the Settings Section.
- Click on Actions > Enable to enable the rewards for the members.
To Configure the Email element (Coming Soon)
- Click on Email element.
- Click on the dropdown menu to Add an Email Template to this Path
- If you want to Add JSON variables for exit define tier Progress, add these here. For more information on the tier variables, click here.
- Click on Save to update your changes.
To Configure the If element
- Click on If element
- Choose the Streak metric to track, which are currently:
- Sum of Purchase Amount.
- Count of Purchases.
- Update the filter to refine who qualifies:
- Choose Match All or Match Any. In this example, we have chosen Match All.
- Choose a condition criterion from the dropdown list to refine who qualifies. The filters will vary based on the initial trigger picked. In this example, we have chosen the Sum Of Purchase Amount and Count of Purchases.
- Set the comparison filter. In this example, we have chosen Greater than or equals 25 and Greater than or equals.
- Then and Else will be greyed out and will move the true or false.
- Click on Save to update your changes.
- Now, you need to configure the True and False elements.
- Please refer to Unlock Reward, Email, or you can do another Conditional Split.
Step 5: How to configure the streak for the member loyalty dashboard
- Click on Settings
- Customize how the Streak appears in the End User Dashboard
- Select Language- Pick the language that you want this to appear in. You can have multiple language setups.
- Title - The title of the Streak.
- Message - The description of the Streak.
- Member progress message- The progress message of the Streak.
- Streak completion message - The completion of the Streak.
- Streak broken message- The message when the member has broken the Streak.
- Call to Action - The CTA message.
- Validity - The message for when the Streak ends.
- Click on Save to update your changes.
Step 6: How to make your Streak Live
- Click on Publish whilst inside the Streak you have created.
- A pop-up will appear to make sure that you are ready to launch this Streak.
- If you are happy to Publish, click Confirm. You have changed your mind, click Cancel.
Alternatively, you can Publish directly from the Main Page
- Navigate to Gamification > Streaks.
- Scroll to the Streak you would like to Publish.
- Click on ...
- Click on Publish.
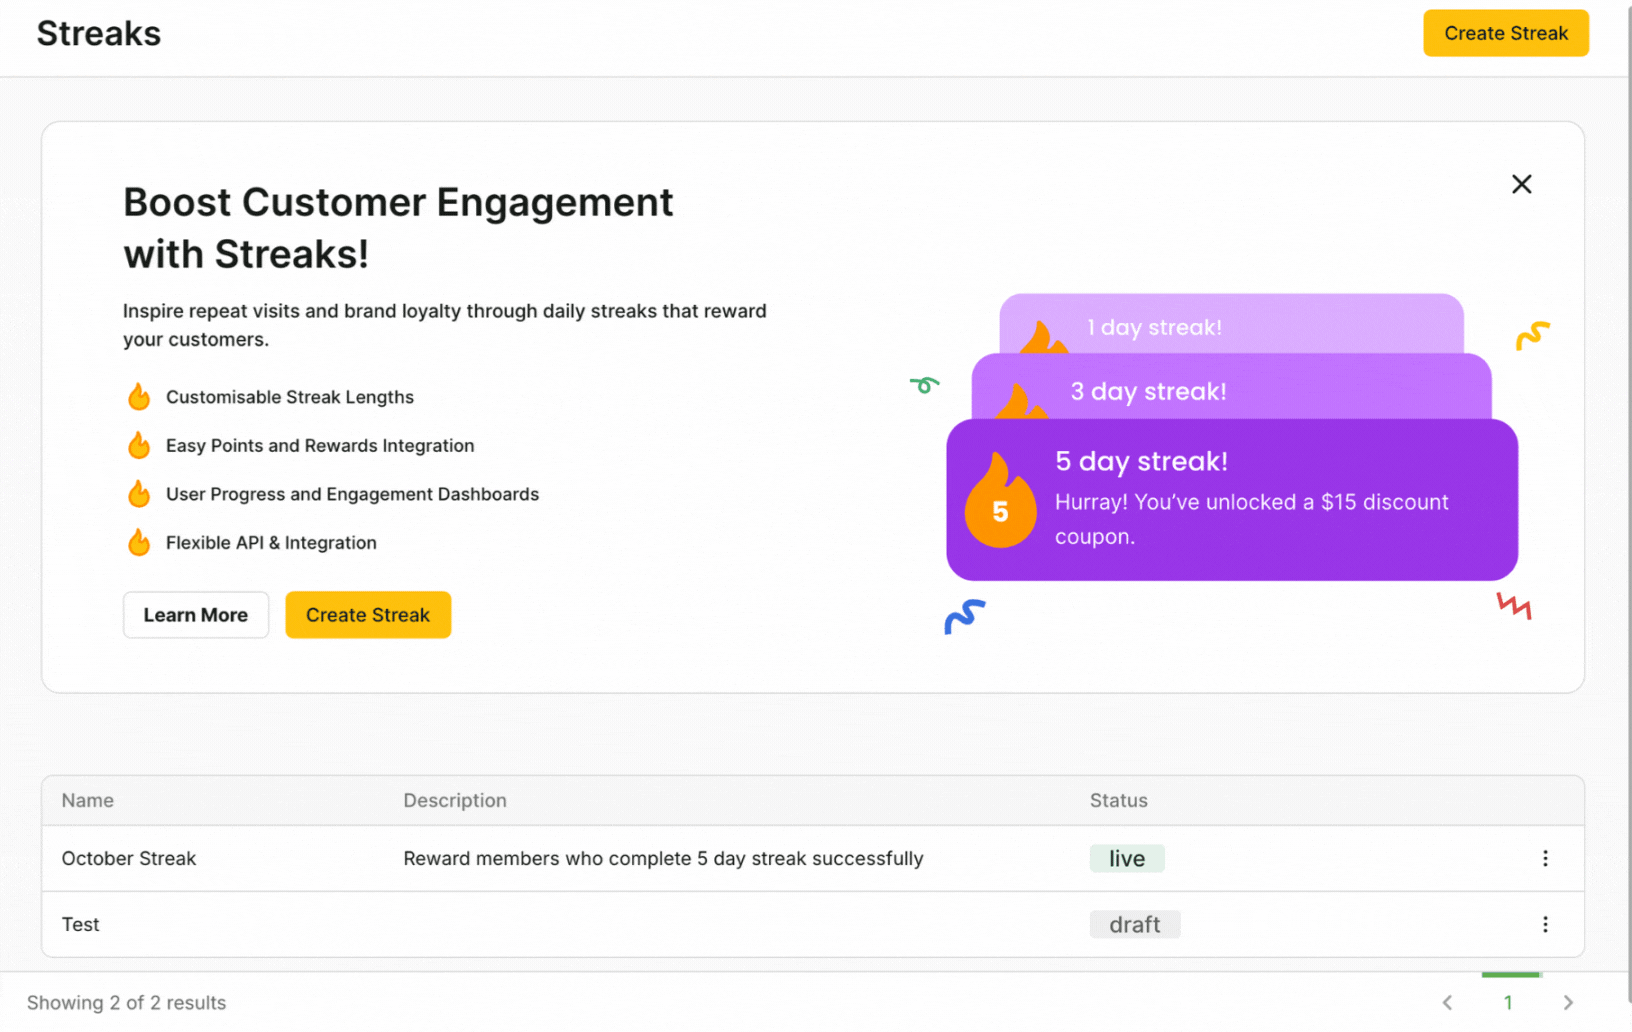
- The Status will change from Draft to Live.

How to Pause your live Streak
- Navigate to Gamification > Streaks.
- Scroll to the Streak you would like to Pause.
- Click on ...
- Click on Pause.
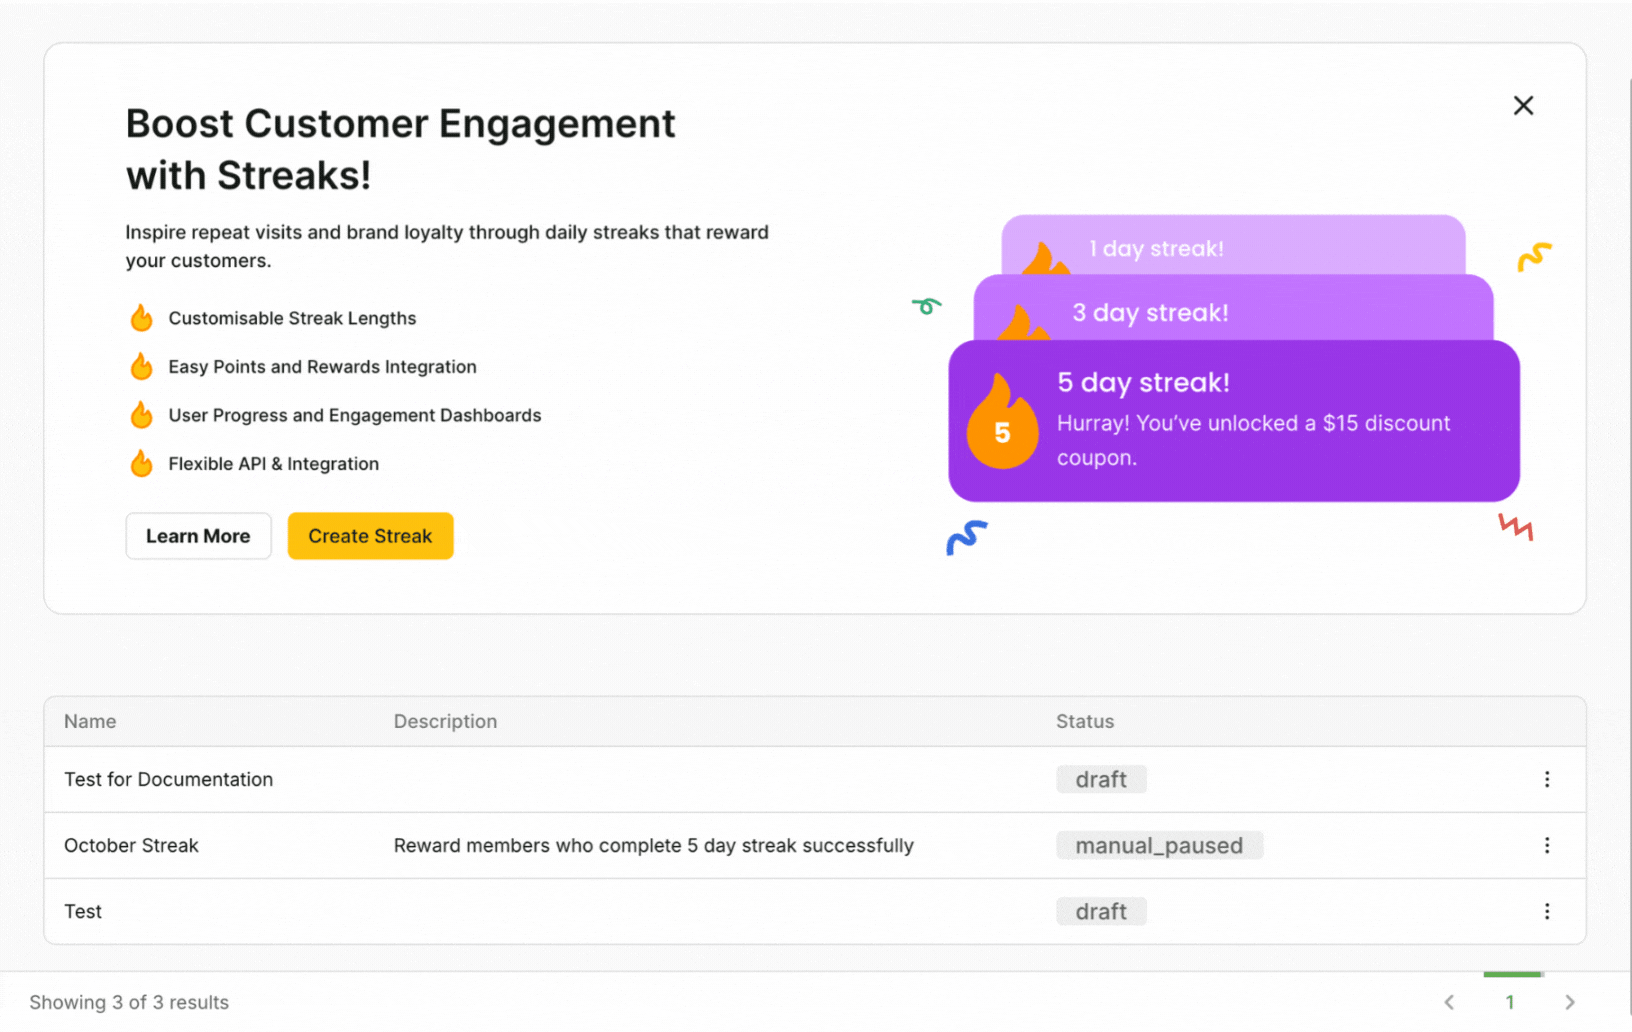
- The Status will change from Live to manual_paused.
How to Delete a Streak
- Navigate to Gamification > Streaks.
- Scroll to the Streak you would like to Delete.
- Click on ...
- Click on Delete.
Updated 18 days ago